Title: Nimble, Package Management, Github and Atlas Package Cloner
Alt Title: Nimble, Package Management and Github
Prerequired knowledge: At least a few Nim for Beginners videos
INTRO - FOREWORDS
(What is the purpose of this video ?)
Nimble, Package Management, Github and Atlas Package Cloner:
In this video we will go over Package Managers.
Creating a package using Nimble the default Package Manager for Nim.
Creating your own repository on Github, uploading your package to Github,
and Atlas the Package Cloner as an alternative to the Nimble Package Manager.
The code for this video and it's script/documentation styled with nimib,
is in the link in the description as a form of written tutorial.
1. What is a Package Manager ?
A package manager is a program with a repository of libraries/modules and programs,
with functionality to easily search, download and install,
a package with all the required dependency packages containing libraries/modules.
A package manager can also help with development of your own libraries/modules and programs,
and their distribution/sharing.
1.1. Why should you use one ?
Unless you wish to manually search, download and install,
and repeat that process for every dependancy that package may have,
and repeat that process yet again when wanting to update,
you should use a Package Manager
Linux distributions use package managers for all their program and library needs, with auto update functionality

Windows does not have that, well it does, but package managers for Windows,
barely scratch the surface of the crazy vastness of programs and libraries that Windows has.
Therefore, if many of the programs, libraries you use are not in a package manager, you are better off without one
1.2. Nimble Package Manager
We have already used a bit of nimble the default package manager bundled with all the recent Nim versions,
in the first "Nim SDL 2 Game Development for Beginners" video.
Now we will refresh that knowledge and expand upon it.
Nimble's repository is at "https://github.com/nim-lang/packages" with an overview at "https://nimble.directory/".
If a package is in that repository, you can simply install it with nimble install desiredPackage.
There are also packages that are NOT in nimble's repository, but instead on github.
Those require the installation of the git program from this link: Git.
There is also the github desktop a graphical version of the git program,
if that is your preference Github Desktop.
Nimble also supports `Mercurial` repositories
https://nimpkgs.dayl.in/ another `nimble` repo
https://nimble.eu.org/ another `nimble` repo
2. Nimble Basic Usage
The following are nimble commands that are required for basic usage of nimble:
nimble update/refresh - to update the packages list
nimble search - to find the desired module/program
nimble install - to install the desired module/program and it's dependencies
nimble uninstall
nimble -h - for the full list of nimble commands
you can also just type nimble and get the same
2.1. update/refresh
I am using the `nu` shell that works on all platforms
2.2. search
nimble search does not work with github urls
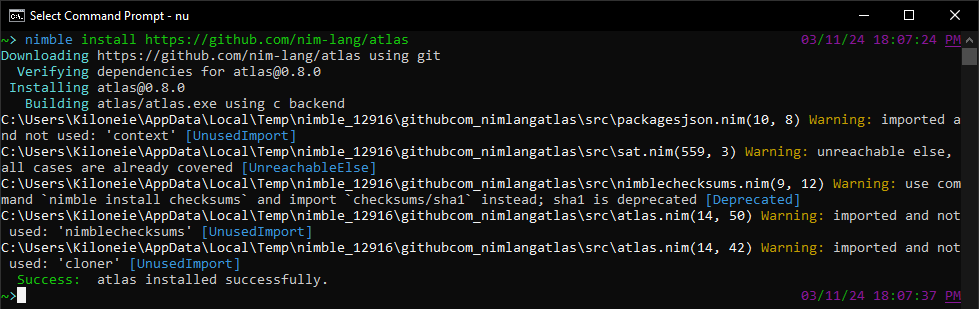
2.3. install
The install command can be used in the following ways:
nimble install - to install your own local package when inside of it's folder(top most level)
Due note that any dependencies it may have, will be installed globally
`nimble install owlkettle@#head - latest devel(development) version
nimble install [package1, package2] - for multi package install
nimble install [c2nim, owlkettle]
2.4. uninstall
nimble uninstall packageName
nimble uninstall [pkg1, pkg2]
nimble uninstall [c2nim, owlkettle]
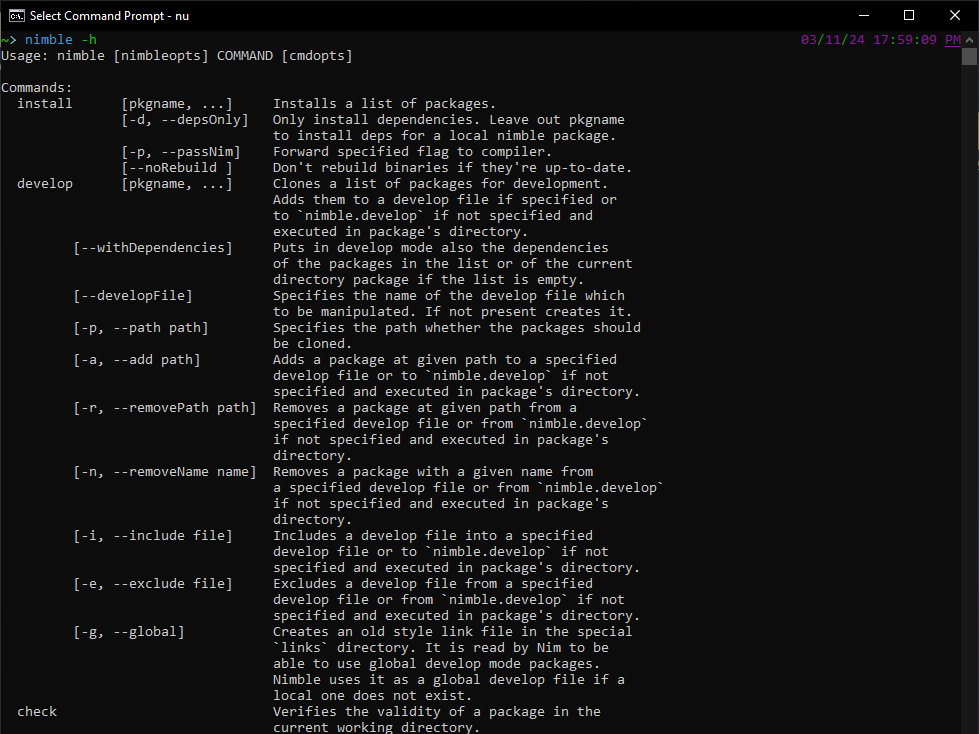
2.5. -h or --help for help/manual
This goes on for a bit
2.6. Usage with github
3. Creating Packages using Nimble
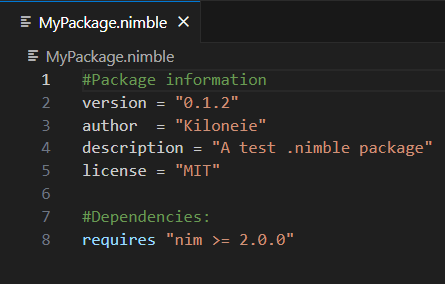
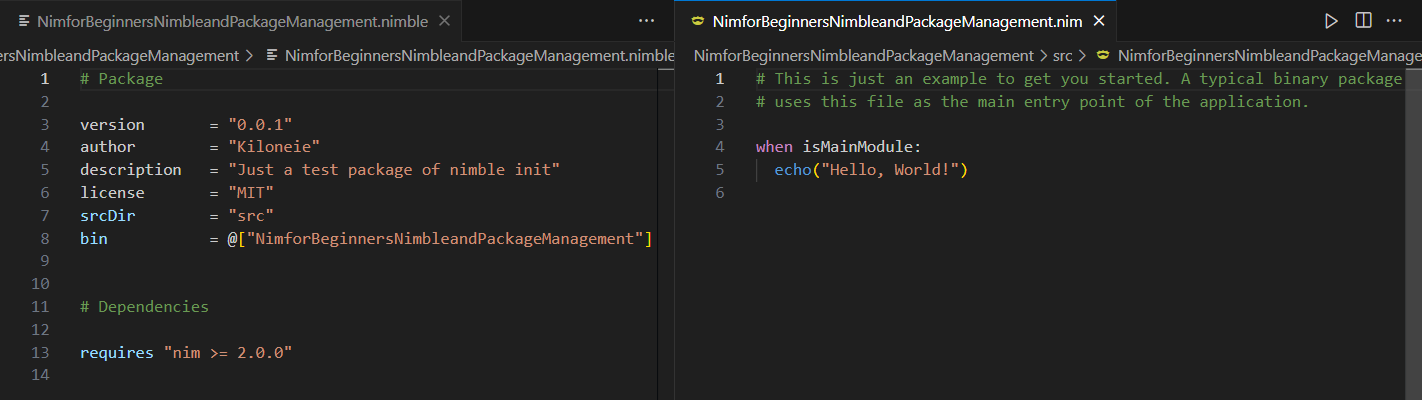
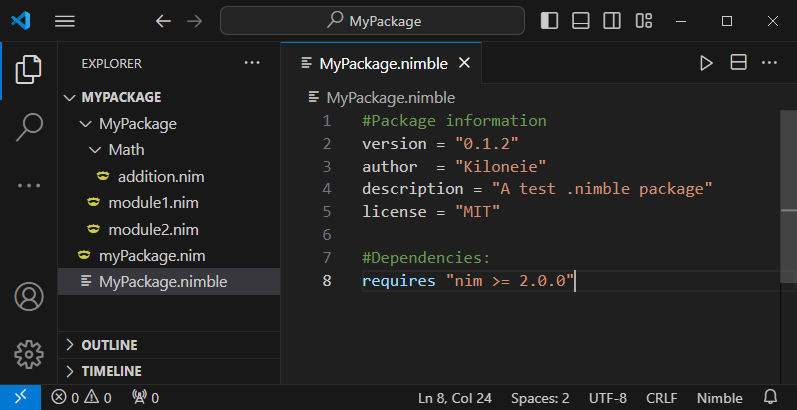
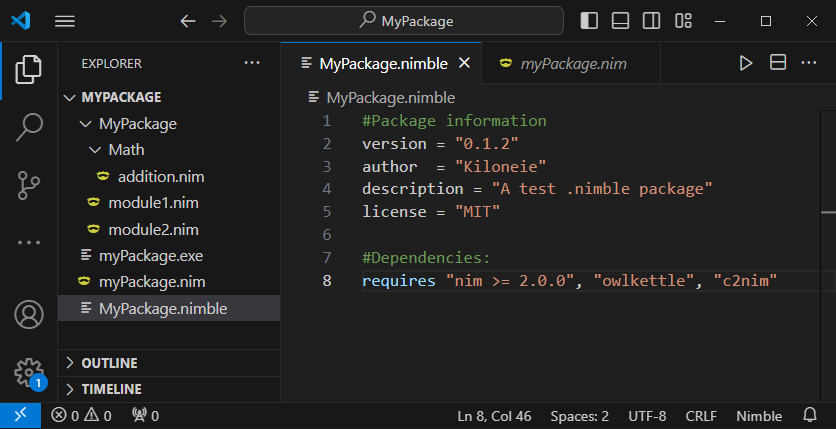
3.1. .nimble file structure
All nimble packages end with .nimble file extension, and they all have a certain file structure,
of package information and dependencies.
The following example showcases the .nimble file structure:
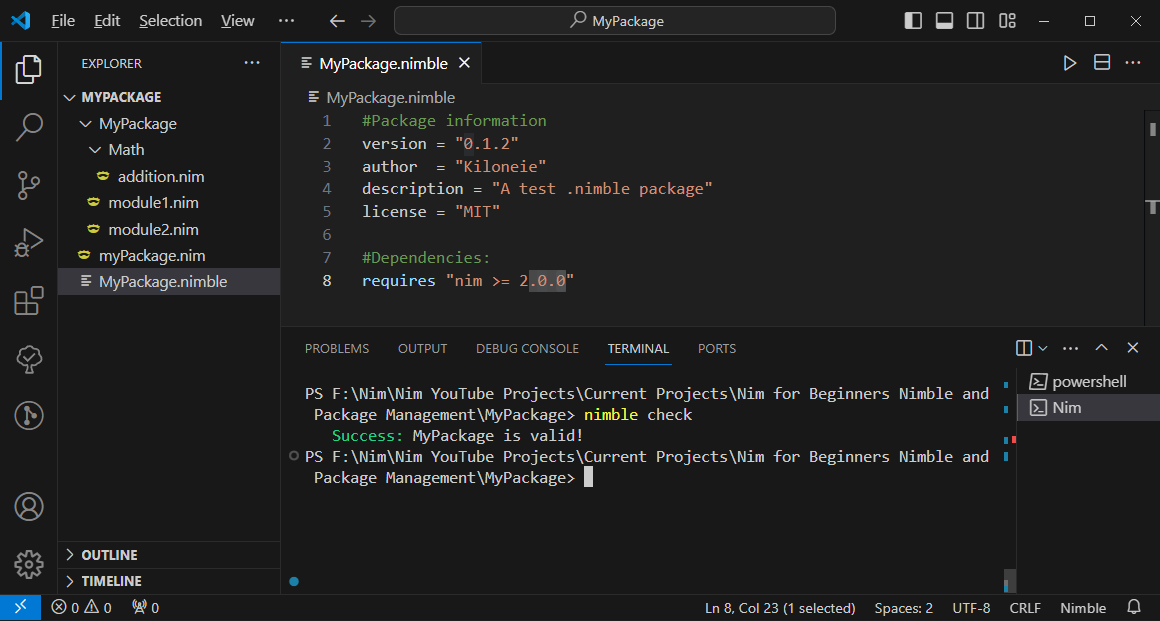
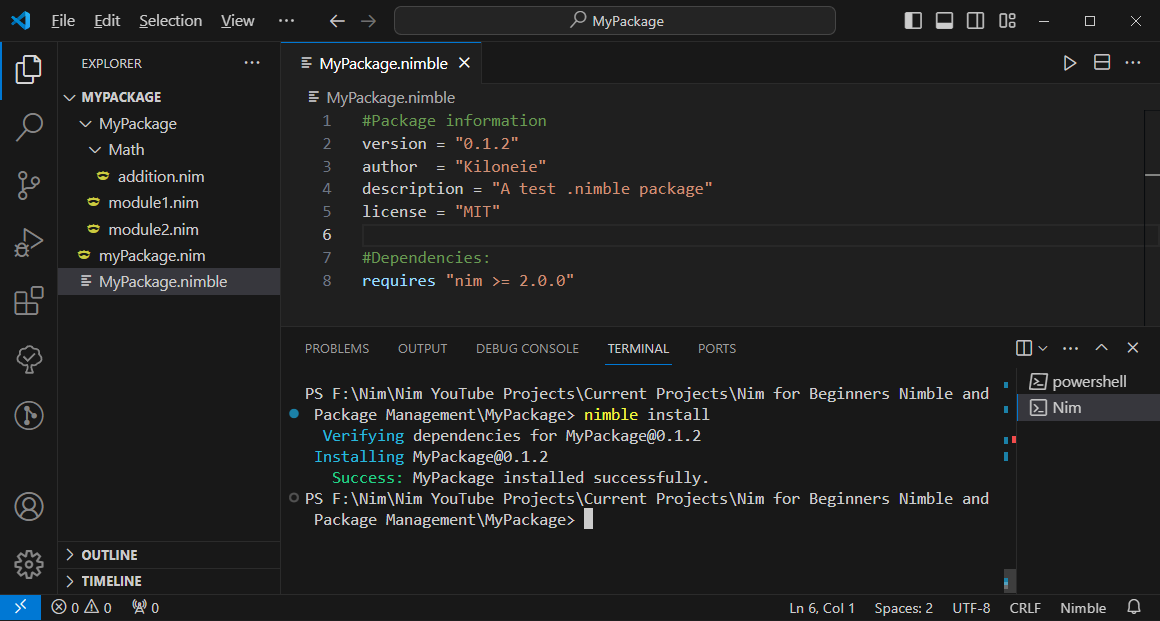
3.2. Checking, Installing and Uninstalling your own Packages
Once you are inside the top level of your Package's folder(current working directory),
e.g. opening the first folder called MyPackage with VS Code,
or navigating to there with a command line/terminal,
you can then install your package by simply calling nimble install,
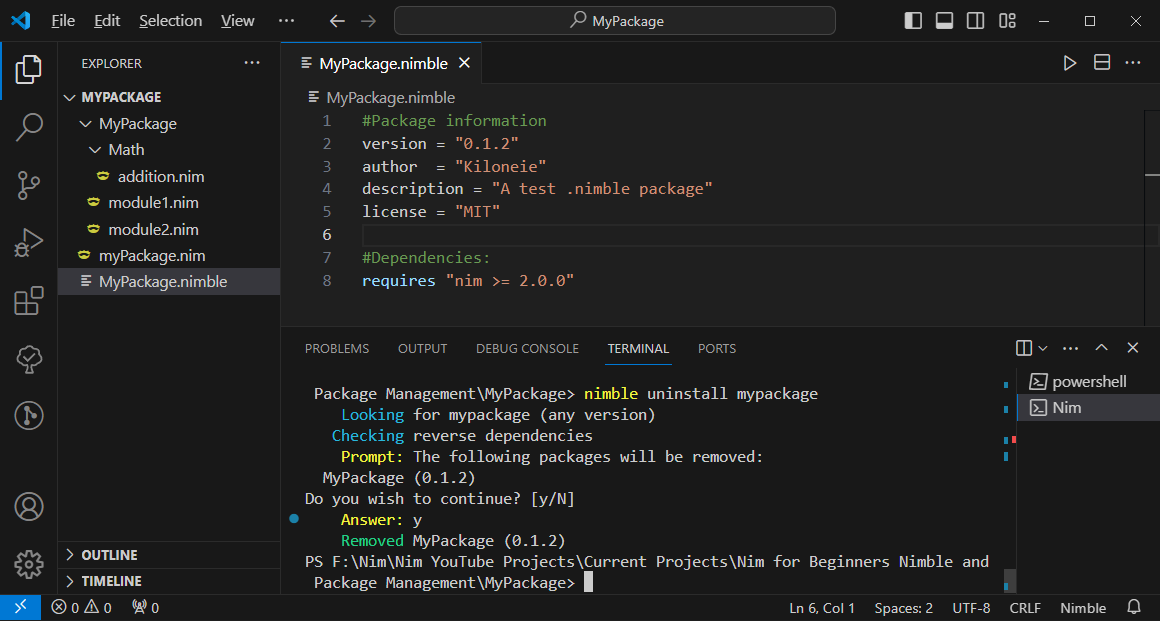
and to uninstall you can then use the name you chose for your package,
which will be the top most folder the package is in(current working directory), so in my case "MyPackage".
But before all that, there is a nible check command, that verifies the validity of your nimble package
Check
Install
Uninstall
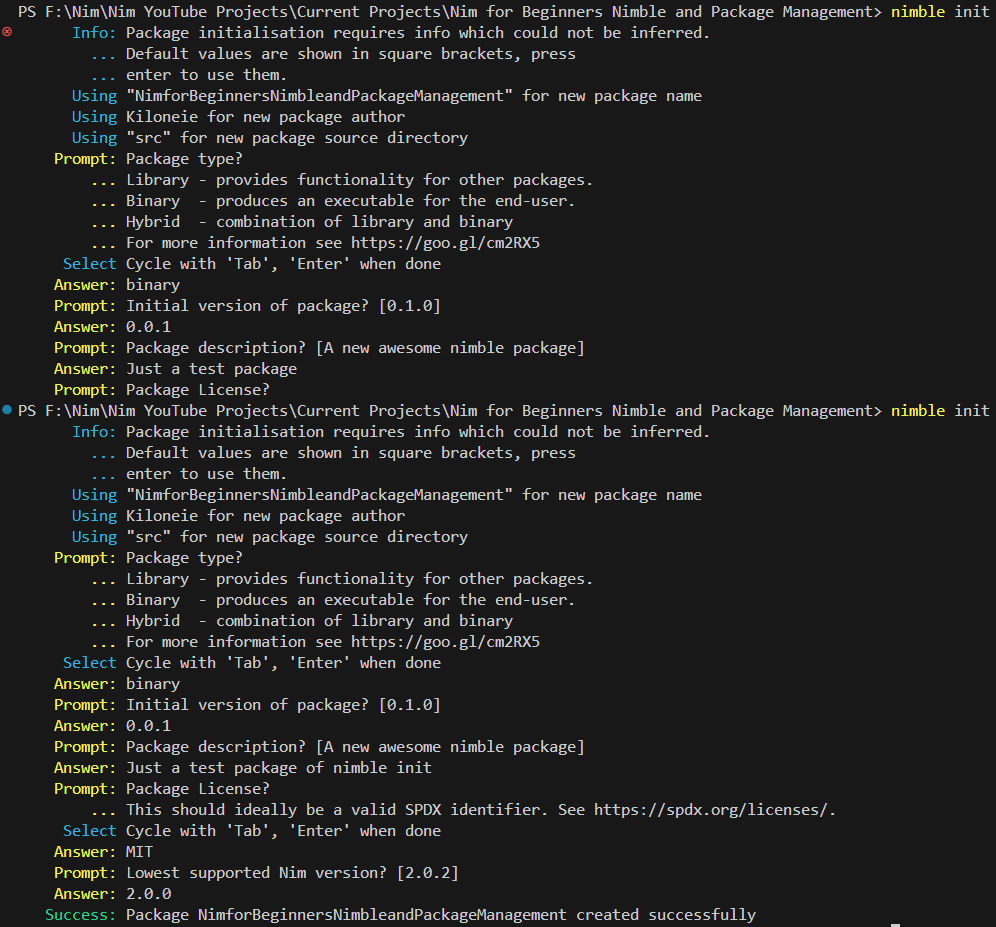
3.3. nimble init
By typing nimble init when inside the top most level of your package(current working directory),
via VS Code or an external terminal, it will start a setup process to create a new package,
a new .nimble file, via prompts that will be asked of you,
like shown in the image below:
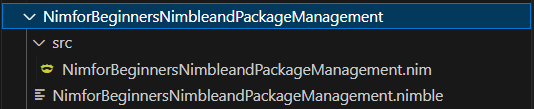
The above will create the following folders and files:
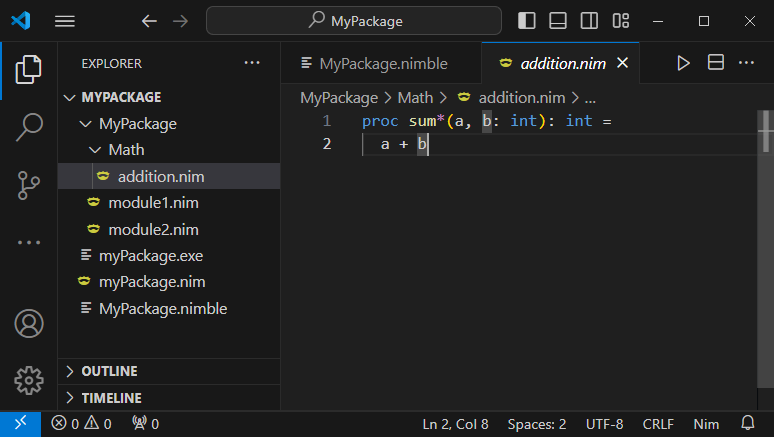
3.4. Directory layout for library/module type packages
There is a directory layout that library/module type nimble packages must follow.
if you wish to be able to import them in the following way import mypackage/math/addition(letter case does NOT matter here).
The directory structure must have a second folder named exactly the same as the package's
folder's name. In this example "MyPackage" is the name of the package and the folder,
which then has another folder of the same name to contain YOUR OWN modules for that package.
NOTE: Nimble packages .nimble, like with config.nims configuration files,
use a subset of Nim's features in order to configure the package with code logic.
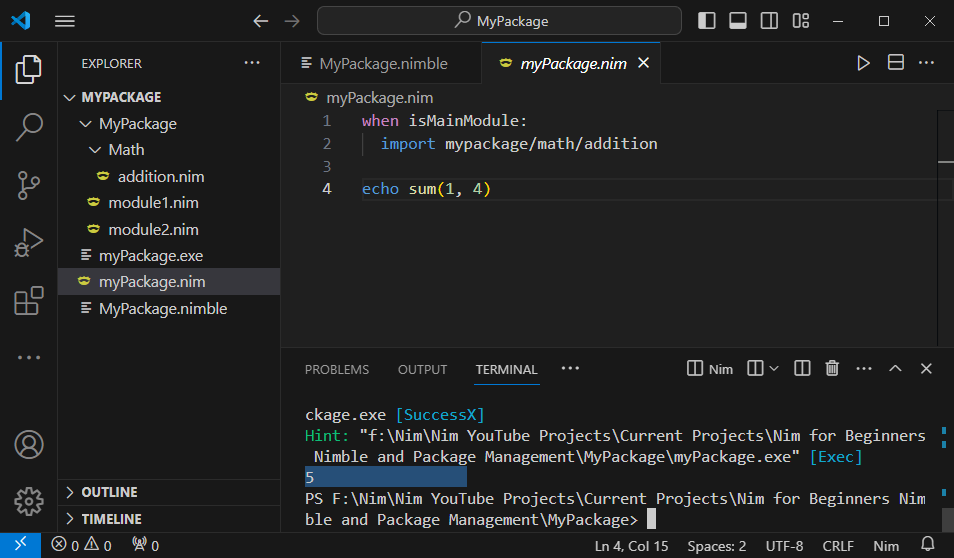
Make sure to use the export symbol * for the procs, data types, etc,
you want to be able to use directly from your main program.
And now the desired import layout with the exported sum proc used
when isMainModule will only run when this "myPackage.nim" is being compiled DIRECTLY,
and not from nimble or other nim files.
4. Compiling with Nimble vs Nim
You can also use nimble itself to compile Nim files,
but it will not import any modules whose packages were not directly specified as a dependancy.
Only the Nim's Standard Library is the exception here.
This can very useful to be ran before publishing your package for the first time,
or updating it on Github, since it erroring,
will mean that if you were to publish or update your package without specifying dependencies,
the user of your package will receive a broken package.
5. Dependencies
In order to add dependencies for your package so that it will run correctly for others,
or yourself on a different computer, you need to add them to the setting variable of,
requires, by appending additional dependencies as string(like an argument),
after the initial dependency of the version of Nim, like this:
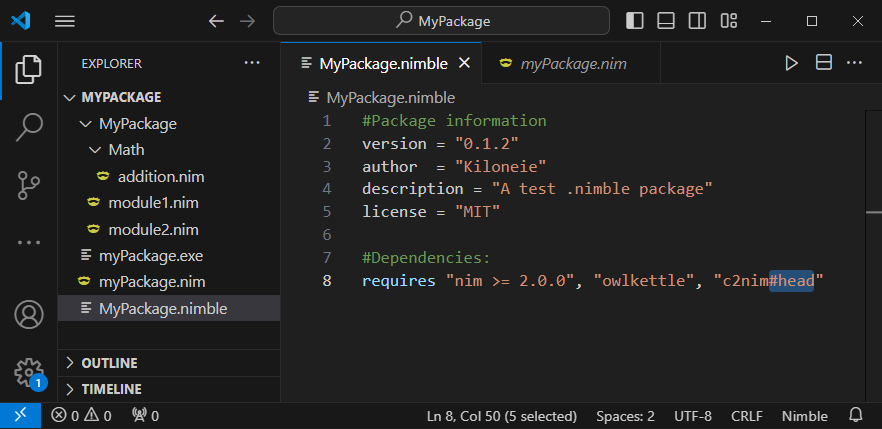
5.1. Bleeding edge dependencies
If you wish to use the current/latest development version(made with nimble develop) of a package,
in order to be on the bleeding edge, or help with the development of a package,
you can do this by adding #head after the name of the dependency in string,
like this:
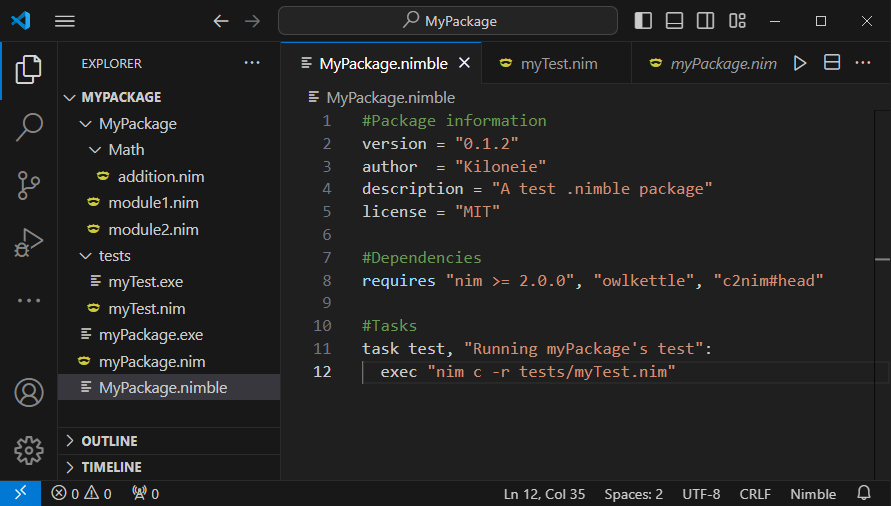
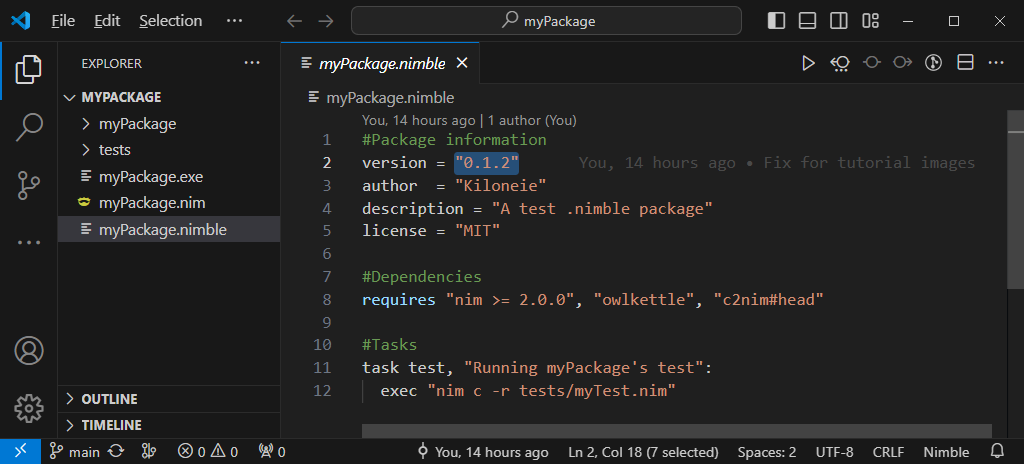
5.2. Unit Testing with Nimble
I have not yet shown you the unittest module made specifically for testing code,
which is used by the Nim's developers and a lot of other Nim users, to have people contribute code,
and then if it passes trough the tests, is then considered mostly safe and ready to be integrated.
This is just one of the bigger use cases for the unittest module.
Nimble can run these tests for you via nimble taskName,
but first you must add the following code to your .nimble file of your package:
task test, "Running myPackage's test":
  exec "nim c -r tests/myTest.nim"
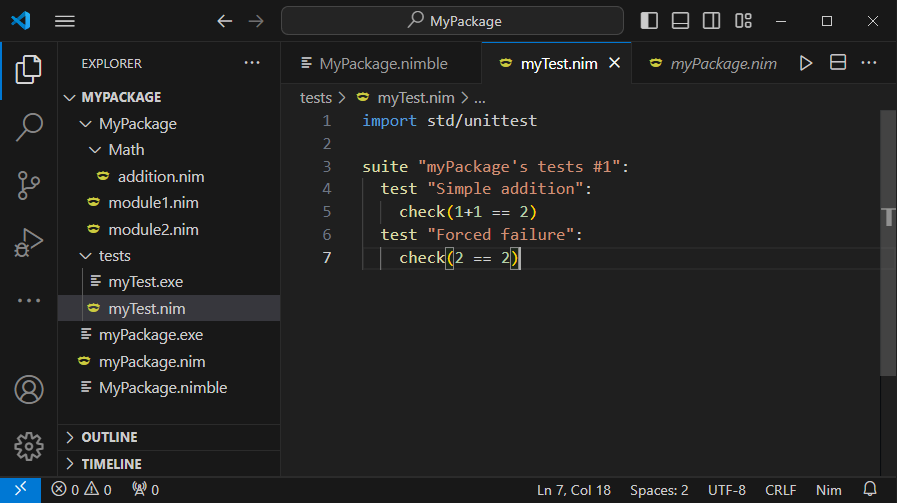
Once the task is set, we create the tests folder and in it myTest.nim,
with the following unittest code for a simple example:
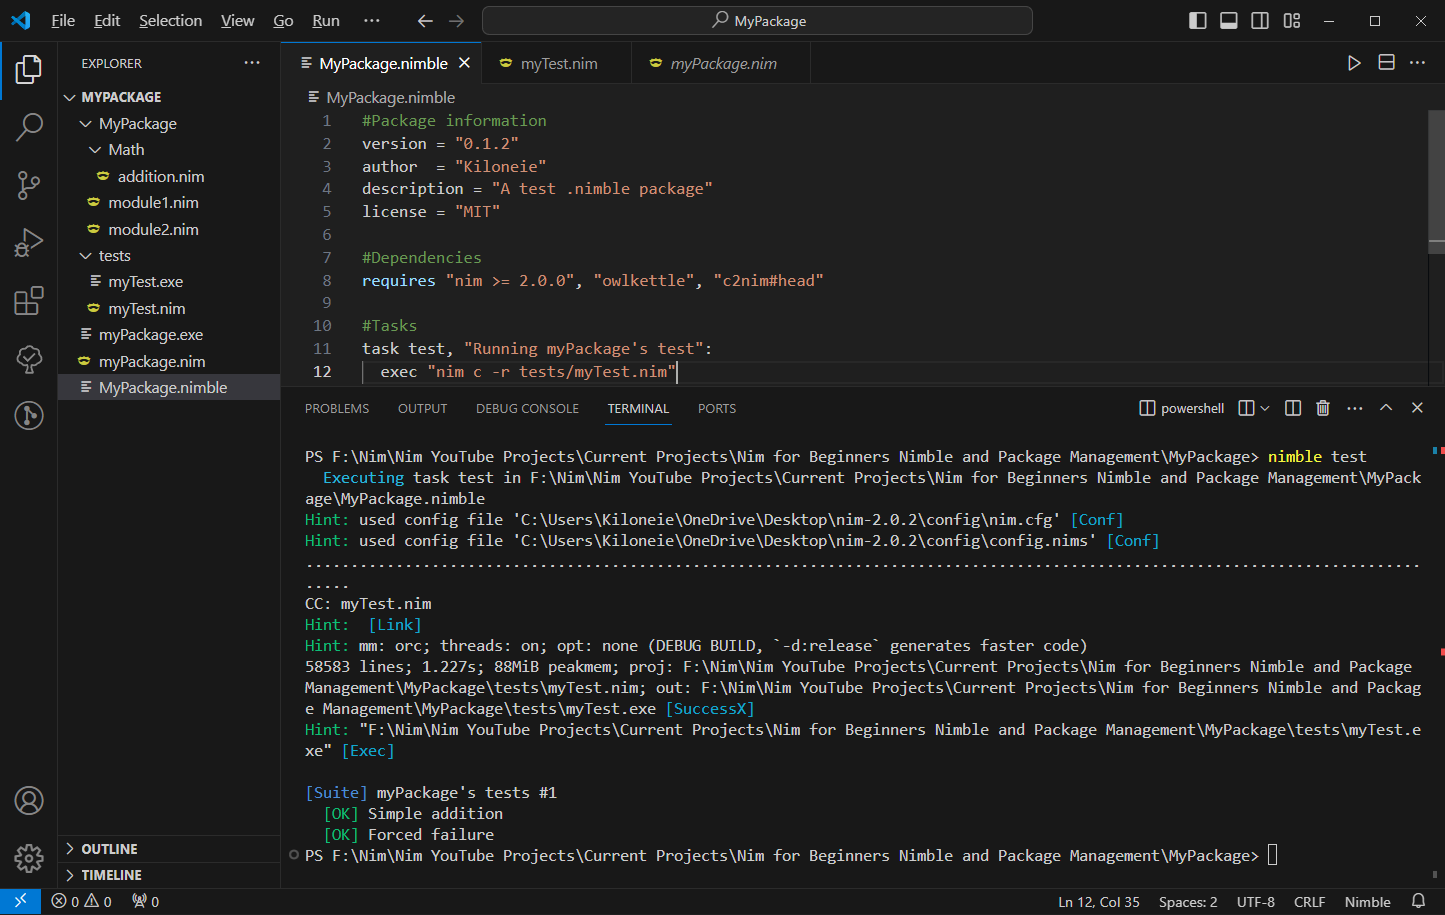
Now, every unittest test, starts with the suite template that starts a block of our tests,
with a given name. Then inside it's block, we use the test template for our named tests,
and inside of these tests, we use the check macro for the logic.
If the condition inside the check macro is true, then the test passes with [OK],
otherwise it fails with a [FAILED], and before it the error message.
Here is how the output looks like when the tests pass using the "nimble myTask", in our case nimble test:
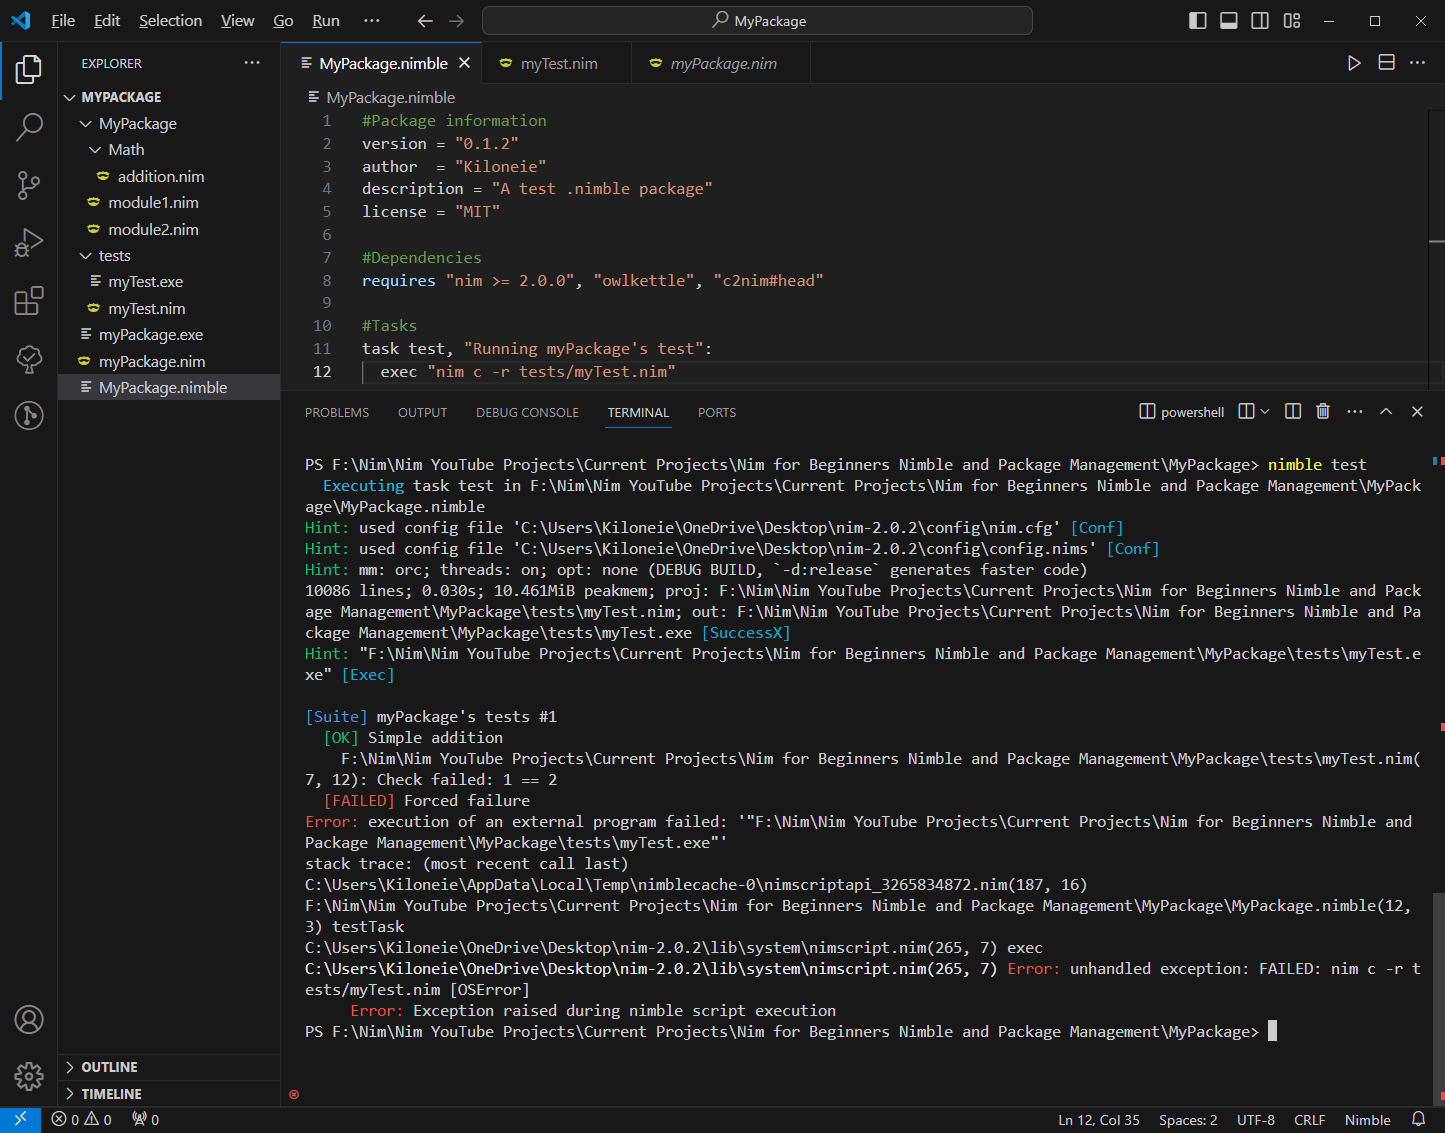
And here is how it looks like if one of the tests fails(check(2 == 2) was changed to check(1 == 2)):
6. Sharing your package with Github
In order for you to share your own packages so that others may find them and use them,
you will need to use a code sharing repository like Github.
Github is by far the most popular code sharing repository out there today.
There are of course some others, but since Github is so popular and Nim uses it for it's compiler etc,
we will use it as well.
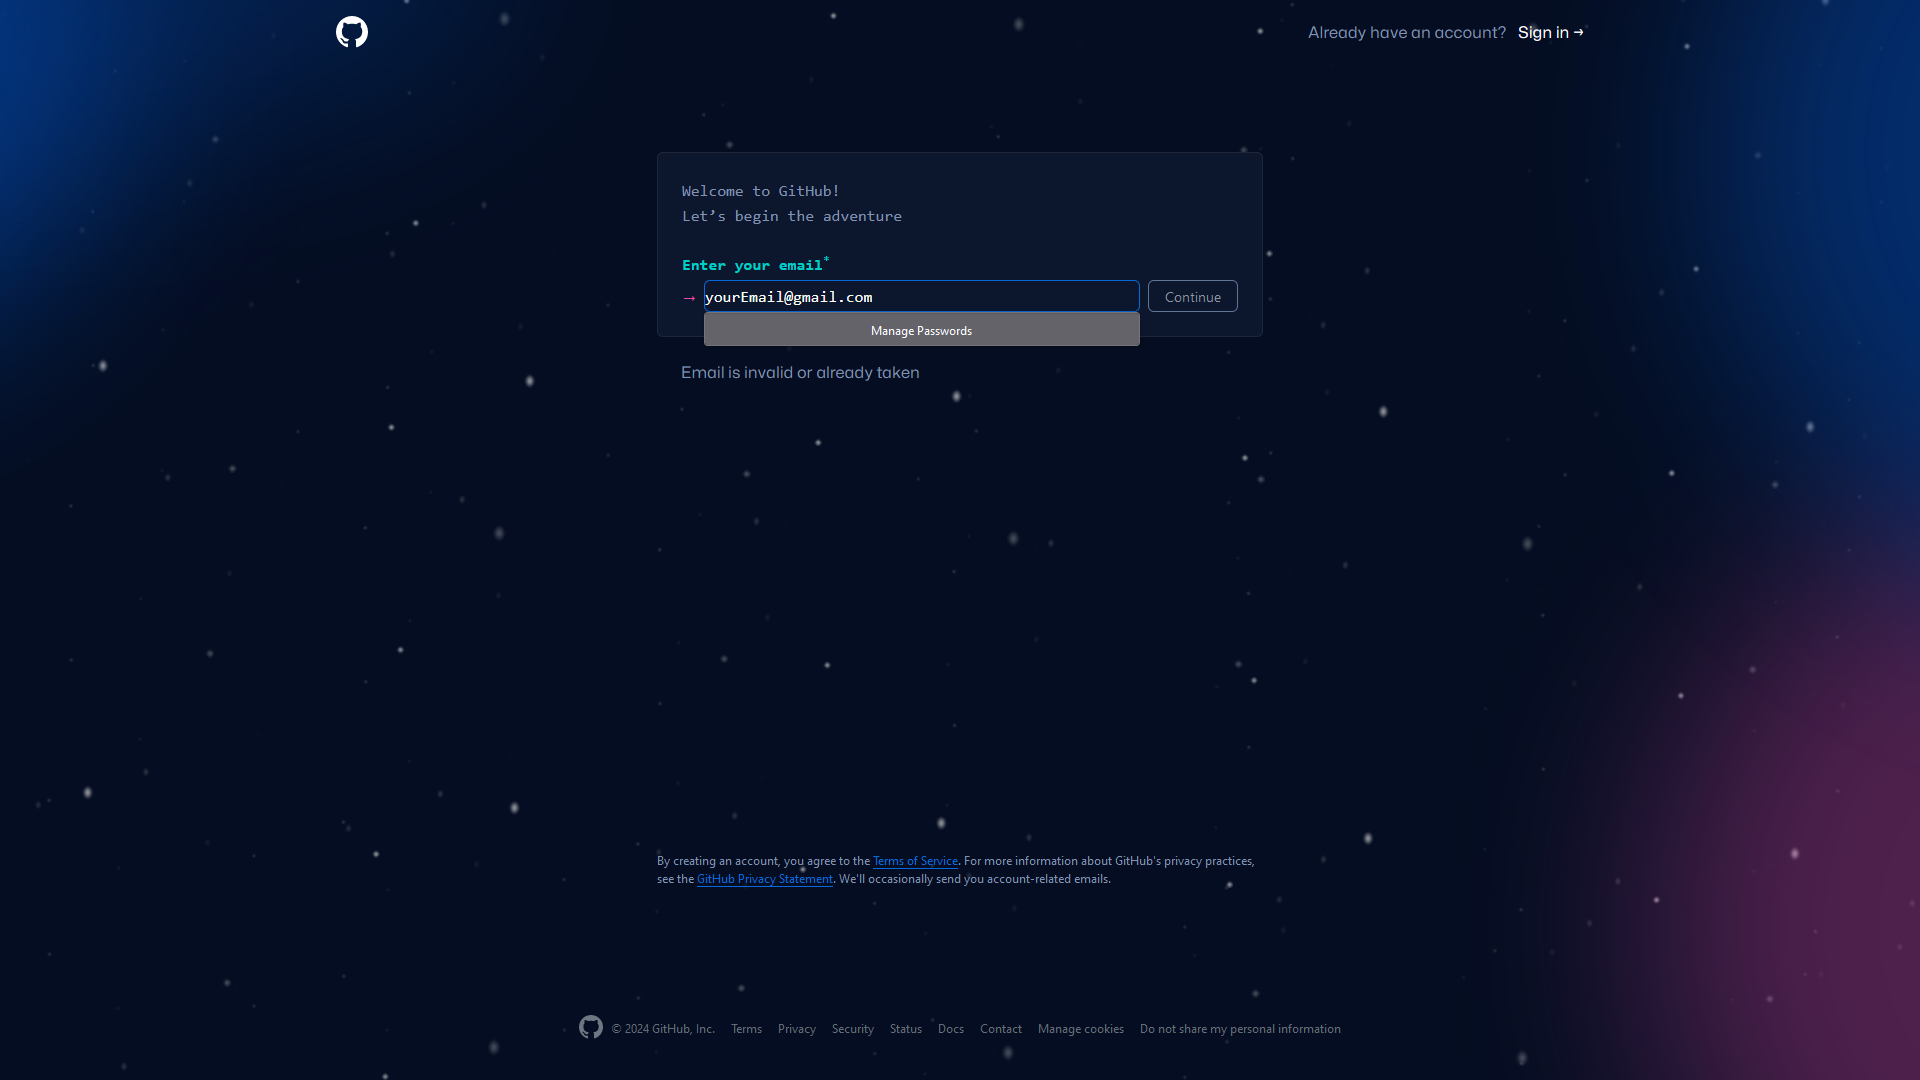
6.1. Creating a Github account
First things first, we will need to make Github account if you don't already.
So head on to the Github's website.
And follow the instructions to create your account(enter an email into that field):
6.2. Creating a Github repository
Once you are done creating your Github account(or you skipped that part),
we will create a new Github repository for your package in the steps shown below:
6.3. Adding your package to your repository
To add your package to your repository, you can do so using either Git commands,
or the Github Desktop graphical program.
We will use Github Desktop as it is much easier to use, and in my personal opinion,
much easier to navigate.
So first off let's download and install it Github Desktop:
(It should also work on Linux, but i have not tested it)
Clicking the Download for Windows (64bit), will immediately start the download for you.
Go ahead and install it. Once done, it should either launch on it's own, or you should do it manually.
Once open, you should see a similar window to the one below(i already have repositories added,
so it might be a bit different):
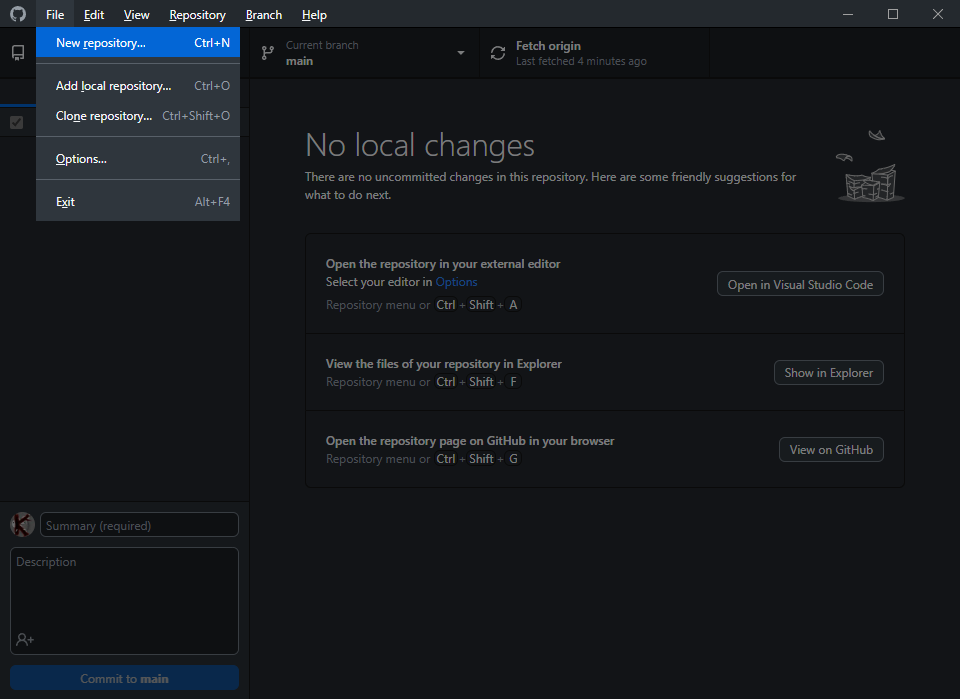
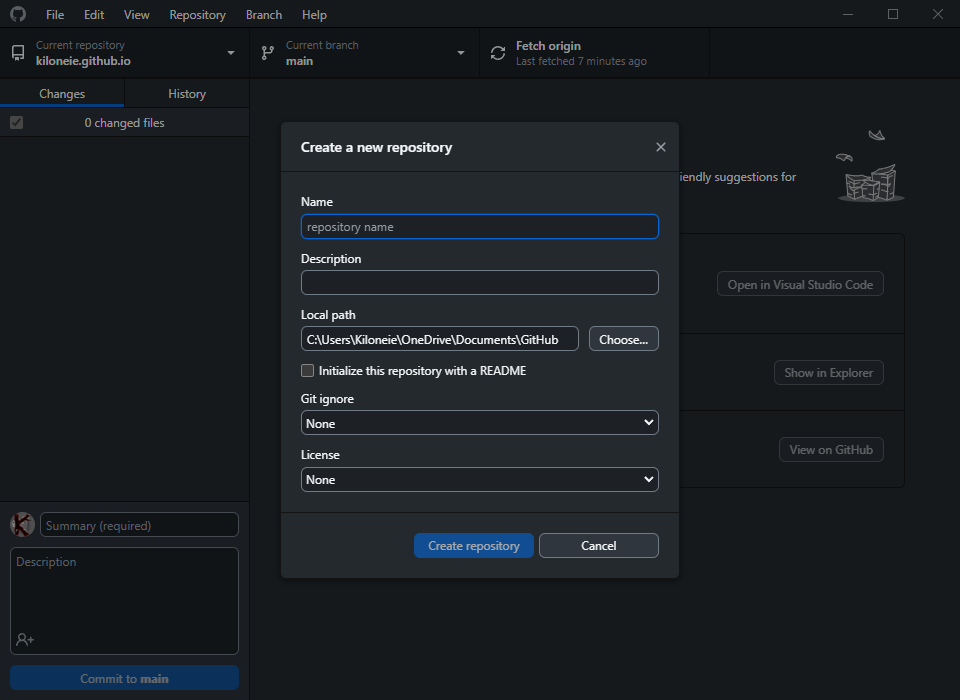
You can also create a brand new repository using Github Desktop instead of using the Github Website,
like this:
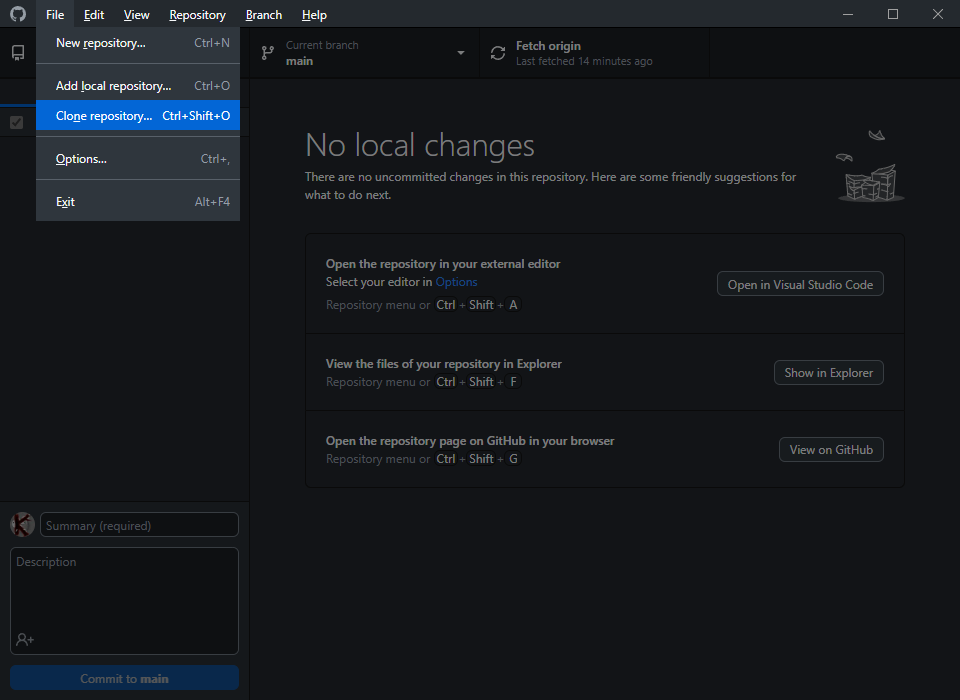
Now, since we have already made a repo using the Github's Website,
in order to connect the repository on Github with our myPackage folder and it's files,
we have to clone the repository we have made on Github like this:
We are now inside our myPackage repository like seen in Github Desktop in the top left corner.
Now we have to add our folder of where we first made our myPackage,
into the repository's folder, which can easily be accessed by clicking the following button:
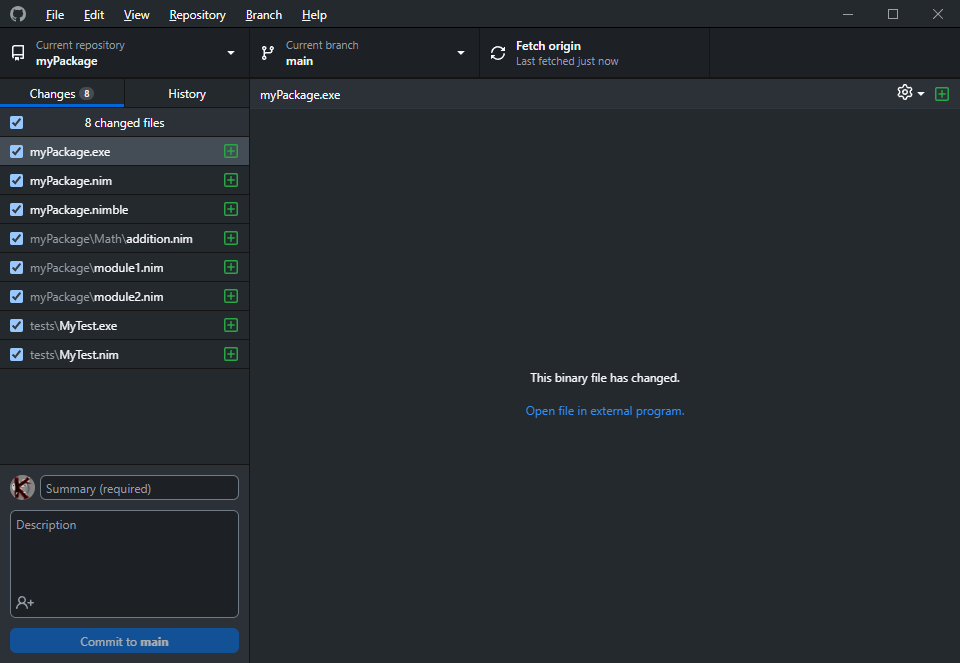
By copy pasting our myPackage folder into the repository's folder, like this:
(you should not see the `git` folder over there, i am seeing it because i enabled seeing HIDDEN files)
Will cause Github Desktop to immediately detect the changes like this:
Now what we have to do is, commit these changes to the main and only current branch of our repository,
by first giving a summary/title with a description, which once commited and pushed to origin,
will be stored on Github as information for you and others if you made your repository public.
This information can be quite helpful, and Github will store all changes to the repository WITH these descriptions,
which you can then easily view once pushed to Github, more on that later.
So let's give our changes some simple information and click the blue button of Commit to main:
Now the changes are commited, but we still need to upload them to Github,
by clicking the Publish branch(if you already have a branch on your repository, the button will instead read,
Push to origin).
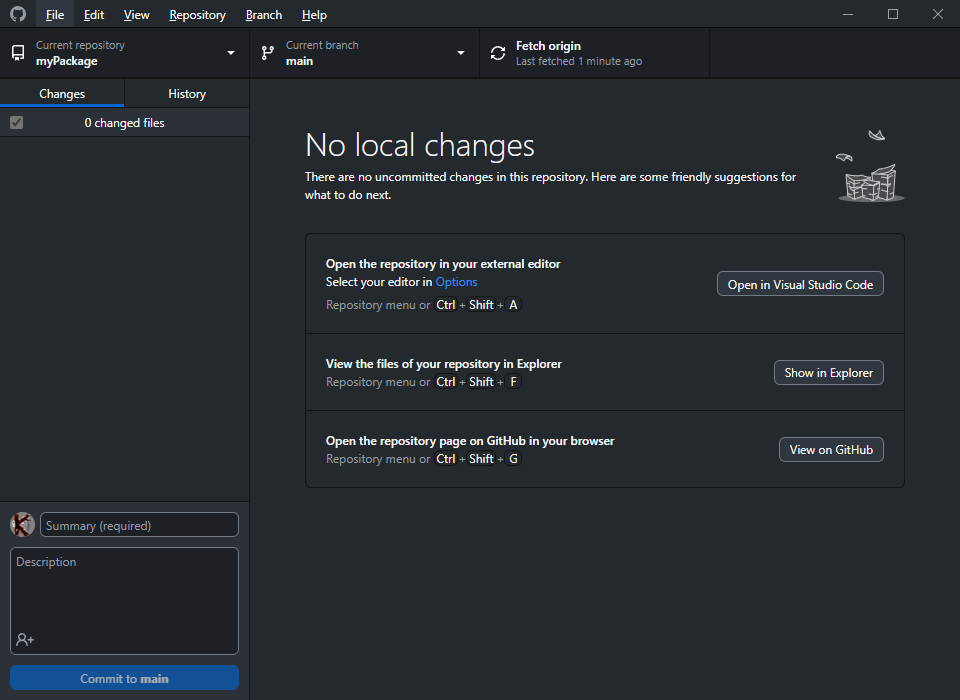
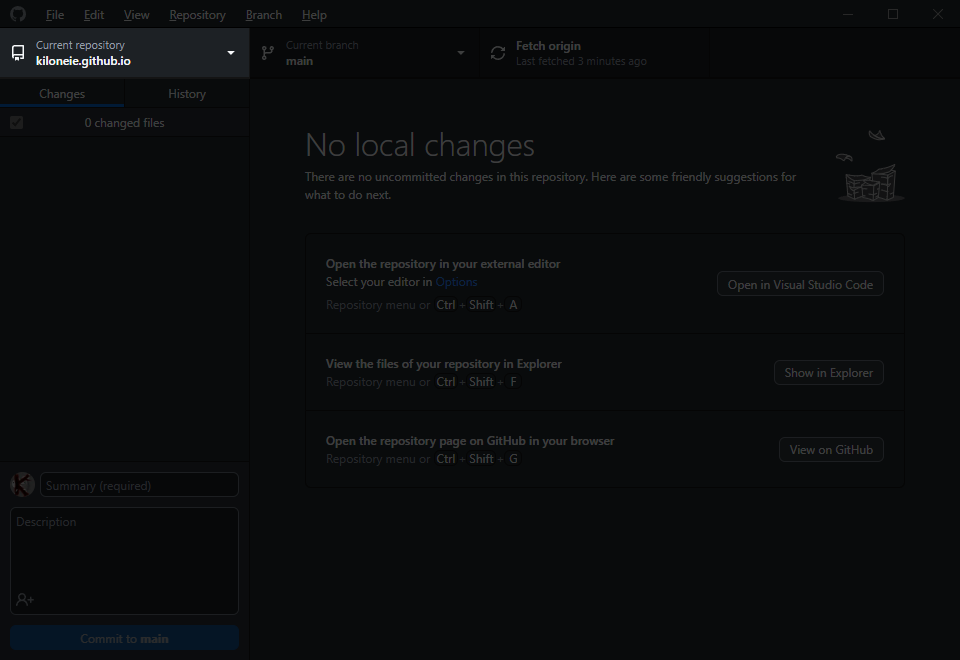
If the changes were pushed to origin/uploaded successfully, you should see the initial Github Desktop window,
like this:
And with that, you should see the following on your Github repository:
There is one last thing i want to show you about Github Desktop,
the History tab.
By clicking it, you should see something similar to the following:
Here is where you can view ALL of your commit history for your package's Github repository.
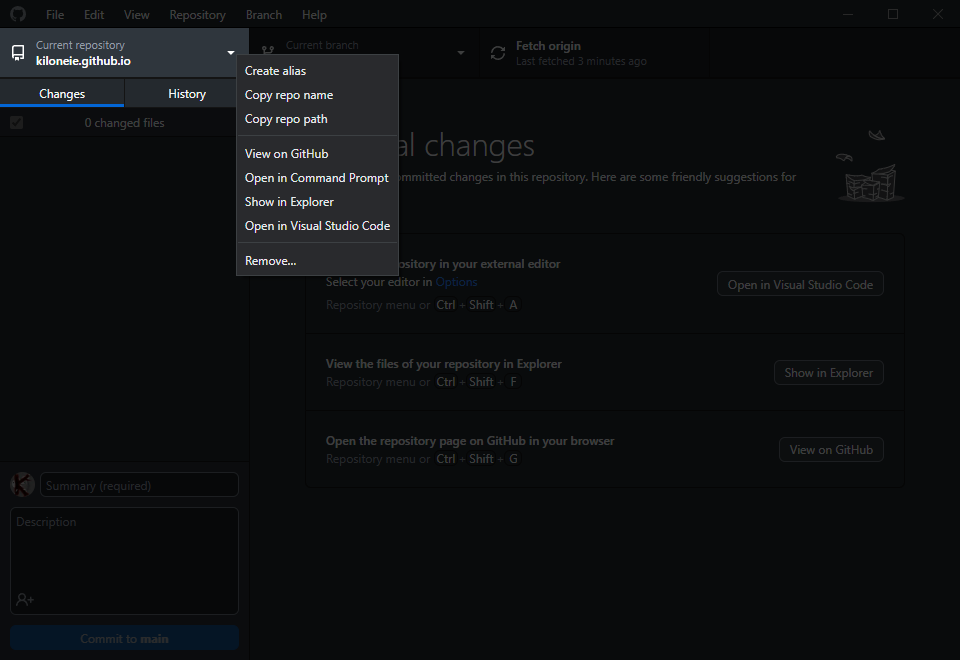
By the way, when opening Github Desktop, on the right side of it, you get the options of Open in Visual Studio Code,
Show in Explorer and View on Github. These get hidden when changes to your package's repository get detected.
To find them again, right click on the Current repository yourRepository in the top left corner,
and you will get those options back.
6.4. Git Lens
I HIGHLY recommend installing the Git Lens Visual Studio Code Extension,
which adds a TON of functionality to make your life much easier when working on your own Github repositories,
and repositories made by others.
In order for you package to be found by other Nim users using Nimble,
you will have to publish your package to Nimble's repository,
by either manually going to github.com/nim-lang/packages,
and opening a pull request in the top left:
Read about pull requests if you don't know about them yet here Pull Requests
7.2. Publishing using nimble publish
There is also option 2 of using nimble publish from inside your local copy of your package's repository.
If you go with the nimble publish you will then get instructions to follow.
Follow the instructions to completion.
Once you have finished those instructions, it will make things much easier in the future.
You will then have to wait for someone to verify your package and change things if necessary.
Once your package is in the repository, you will no longer need to publish it ever again.
Instead all you will have to do, is make a new version, tag it, and commit it to Github.
The following link contains a very useful guideline for versioning,
that you should read when making a package that you intend to continue developing for a long time:
Semver/Semantic Versioning.
7.3. Adding a new version of your package
When creating a new version of your package,
you will have to do a few steps so that nimble will be able to find it.
The first thing you will have to do is increment the version of your .nimble file:
Once that is done, you will have to commit this change to your Github repository via commit changes,
like i have shown you earlier via Github Desktop,
WITHOUT push to origin to upload them, as they are not yet ready to be uploaded.
Then step 2 is to tag this version once it was succesfully commited, NOT uploaded via push to origin.
This is done with either Git commands like shown in the following link: Git Tagging,
or with Github Desktop like shown in the following link: Github Desktop Tagging.
Once that is done, you upload these changes via push to origin button in Github Desktop.
(with Git it would be something like: git push origin master --tags).
Once the changes are visible on Github(it takes a minute),
Nimble should be able to find your new version of your package.
8. Some more useful commands
Do we have enough ? I think so ...
9. Cons of Nimble TO INCLUDE OR NOT ?
This and the next section is probably the subject of a future video.
9.1. Atlas Package Cloner TO INCLUDE OR NOT ?
Outro - Afterwords
Okay, that's it for this video, thanks for watching like, share and subscribe,
aswell as click the bell icon if you liked it and want more,
you can also support me on Patreon.
If you had any problems with any part of the video,
let me know in the comment section,
the code of this video, script and documentation, are in the link in the description,
as a form of written tutorial.
Thanks to my past and current Patrons
Past Patrons
Goose_Egg: From April 4th 2021 to May 10th 2022
Davide Galilei(1x month)
Current Patrons
jaap groot (from October 2023)
Dimitri Lesnoff (from October 2023)
Compiler Information
Version used: 2.0.2
Compiler settings used: none, ORC is now the default memory management option(mm:orc)
#Do NOT use {} inside nbText: hlMdF""" """ fields, sometimes it will error, not always#When using - to make a line a list item, you cannot have ANY one of the lines be an empty line#Use spaces by a factor of 2x for indentation in levels# *text* italic# **text** for bold instead of <b></b># ***text*** italic bold#Link 1 - <a href = "link"></a>#Link 2 - [name](link)#Link 3 `name <link>`_ -> without a name works too#nbCodeSkip -> skips the output/echo calls from the file, everything else remains the same#nbCodeInBlock -> opens up a new scope like the "block" statement, useful for when you don't want to use different variable names etc#https://pietroppeter.github.io/nimib/allblocks.html#nbShow is super useful!#<code></code> makes text with a background#https://nim-lang.org/docs/manual.html#lexical-analysis-raw-string-literals raw strings r""import nimib, std/strutils, std/strformat #You can use nimib's custom styling or HTML & CSS
nbInit()
nb.darkMode()
#nbShow() #This will auto open this file in the browser, but it does not check if it is already open#so it keeps bloody opening one after another, i just want a way to update changes quickly# customize source highlighting:
nb.context["highlight"] = """
<link rel="stylesheet" href="https://cdnjs.cloudflare.com/ajax/libs/highlight.js/10.5.0/styles/default.min.css">
<script src="https://cdnjs.cloudflare.com/ajax/libs/highlight.js/10.5.0/highlight.min.js"></script>
<script>hljs.initHighlightingOnLoad();</script>"""# a custom text block that shows markdown sourcetemplate nbTextWithSource*(body: untyped) =
newNbBlock("nbTextWithSource", false, nb, nb.blk, body):
nb.blk.output = body
nb.blk.context["code"] = body
nb.renderPlans["nbTextWithSource"] = @["mdOutputToHtml"]
nb.partials["nbTextWithSource"] = """{{&outputToHtml}}
<pre><code class=\"language-markdown\">{{code}}</code></pre>"""#Overriding nimib's nbCode -> with a version that has horizontal scroll for overflowing outputimport nimib / [capture]
template nbCode(body: untyped) {.used.} =
newNbCodeBlock("nbCode", body): #Writes to stdout `lineNumb typeOfNBblock: a bit of first line
captureStdout(nb.blk.output):
body
nb.partials["nbCode"] = """
{{>nbCodeSource}}
<pre><code class=\"language-markdown\" style = "color:white;background-color: rgba(255, 255, 255, 0);font-size: 12px;">{{>nbCodeOutput}}</code></pre>
"""
nb.renderPlans["nbCode"] = @["highlightCode"] # default partial automatically escapes output (code is escaped when highlighting)# how to add a ToCvar
nbToc: NbBlocktemplate addToc =
newNbBlock("nbText", false, nb, nbToc, ""):
nbToc.output = "## Table of Contents:\n\n"var index = (section: 0, subsection: 0)
template nbSection(name: string) {.used.} =
index.section.inc
index.subsection = 0#Reset on a new nbSectionlet anchorName = name.toLower.replace(" ", "-")
nbText "<a name = \"" & anchorName & "\"></a>\n# " & $index.section & ". " & name & "\n\n---"# see below, but any number works for a numbered list
nbToc.output.add "- " & $index.section & r"\. " & "<a href=\"#" & anchorName & "\">" & name & "</a>\n"#\ is HTML code for "\", you can also "\\" or r"\"#If you get an error from the above line, addToc must be ran before any nbSection template nbSubSection(name: string) {.used.} =
index.subsection.inc
let anchorName = name.toLower.replace(" ", "-")
nbText "<a name = \"" & anchorName & "\"></a>\n## " & " " & $index.section & "." & $index.subsection & ". " & name & "\n\n---"# is inline HTML for a single white space(nothing in markdown)# see below, but any number works for a numbered list
nbToc.output.add " - " & $index.section & r"\." & $index.subsection & r"\. " & "<a href=\"#" & anchorName & "\">" & name & "</a>\n"#If you get an error from the above line, addToc must be ran before any nbSection template nbUoSection(name: string) {.used.} =
nbText "\n# " & name & "\n\n---"template nbUoSubSection(name: string) {.used.} =
nbText "\n## " & name & "\n\n---"template nbCodeSnippet(body: untyped) =
newNbCodeBlock("nbCodeSnippet", body):
nb.blk.output = body
nb.partials["nbCodeSnippet"] = """<pre><code class="hlNim">{{&output}}</code></pre>"""
nb.renderPlans["nbCodeSnippet"] = @["highlightCode"]
#Updating the same file is shown instantly once deployed via Github Page on PC. #Mobile takes either a random amount of time, or NOT at all!template addButtonBackToTop() =
nbRawHtml: hlHtml"""
<meta name = "viewport" content = "width = device-width, initial-scale = 1">
<style>
body {} <!-- This is a comment, this needs to be here body {} -->
#toTop {
display: none;
position: fixed;
bottom: 20px;
right: 30px;
z-index: 99;
font-size: 18px;
border: none;
outline: none;
background-color: #1A222D;
color: white;
cursor: pointer;
padding: 15px;
border-radius: 4px;
}
#toTop:hover {background-color: #555;}
#toTopMobile {
display: none;
position: fixed;
bottom: -5px;
right: -5px;
z-index: 99;
font-size: 18px;
border: none;
outline: none;
background-color: #1A222D;
opacity: .2;
color: white;
cursor: pointer;
padding: 15px;
border-radius: 4px;
}
#toTopMobile:hover {background-color: #555;}
</style>
<body>
<button onclick = "topFunction()" id = "toTop" title = "Go to top">Top</button>
<button onclick = "topFunction()" id = "toTopMobile" title = "Go to top">Top</button>
<script>
// Get the button
let myButton = document.getElementById("toTop");
let myButtonMobile = document.getElementById("toTopMobile");
var currentButton = myButton
var hasTouchScreen = false;
//var contentBody = document.getElementsByTagName("body"); //gives a query object
//myButton.style.color = "red"; //This works
//myButton.textContent = contentBody; //This also works .innerHTML, .innerText
//document.body.scrollTop > 20 || document.documentElement.scrollTop > 20
//Above could be used to position the button relativly ?
// Detecting if the device is a mobile device
if ("maxTouchPoints" in navigator)
{
hasTouchScreen = navigator.maxTouchPoints > 0;
}
else if ("msMaxTouchPoints" in navigator)
{
hasTouchScreen = navigator.msMaxTouchPoints > 0;
}
else
{
var mQ = window.matchMedia && matchMedia("(pointer:coarse)");
if (mQ && mQ.media === "(pointer:coarse)")
{
hasTouchScreen = !!mQ.matches;
}
else if ('orientation' in window)
{
hasTouchScreen = true; // deprecated, but good fallback
}
else
{
// Only as a last resort, fall back to user agent sniffing
var UA = navigator.userAgent;
hasTouchScreen = (
/\b(BlackBerry|webOS|iPhone|IEMobile)\b/i.test(UA) ||
/\b(Android|Windows Phone|iPad|iPod)\b/i.test(UA)
);
}
}
if (hasTouchScreen)
currentButton = myButtonMobile
// When the user scrolls down 20px from the top of the document, show the button
window.onscroll = function()
{
scrollFunction()
};
function scrollFunction()
{
if (document.body.scrollTop > 20 || document.documentElement.scrollTop > 20) {
currentButton.style.display = "block";
} else {currentButton.style.display = "none";}
}
// When the user clicks on the button, scroll to the top of the document
function topFunction() {
document.body.scrollTop = 0;
document.documentElement.scrollTop = 0;
}
</script>
"""#TABLE OF CONTENTS - MUST BE RUN BEFORE ANY nbSection !!!
addToc()
addButtonBackToTop()
#Use Live Preview Extension and set the Auto Refresh Preview set to "On changes to Saved Files"#And Server Keep Alive After Embedded Preview Close set to 0, #so that we no longer need the preview embedded window, we now have it in the browser!#Live SERVER Extension no longer works, even with the .html file kept open################START OF FILE#################Adding hlMd enables nimiboost's markdown highlight mode. hlMdf adds the fmt"{var}" functionality
nbText: hlmdf"""
## INTRO - GREETING
- **Title**: Nimble, Package Management, Github and Atlas Package Cloner
- **Alt Title**: Nimble, Package Management and Github
- **Prerequired knowledge:** At least a few Nim for Beginners videos
## INTRO - FOREWORDS
**(What is the purpose of this video ?)**
- Nimble, Package Management, Github and Atlas Package Cloner:
- In this video we will go over Package Managers.
Creating a package using Nimble the default Package Manager for Nim.
Creating your own repository on Github, uploading your package to Github,
and Atlas the Package Cloner as an alternative to the Nimble Package Manager.
The code for this video and it's script/documentation styled with nimib,
is in the link in the description as a form of written tutorial.
"""
nbSection "What is a Package Manager ?"
nbText: """
A package manager is a program with a repository of libraries/modules and programs,
with functionality to easily search, download and install,
a package with all the required dependency packages containing libraries/modules.
A package manager can also help with development of your own libraries/modules and programs,
and their distribution/sharing.
"""
nbSubSection "Why should you use one ?"
nbText: """
Unless you wish to manually search, download and install,
and repeat that process for every dependancy that package may have,
and repeat that process yet again when wanting to update,
you should use a Package Manager
"""
nbRawHtml: """
<pre><div style = "font-size: 10px">
Linux distributions use package managers for all their program and library needs, with auto update functionality
Windows does not have that, well it does, but package managers for Windows,
barely scratch the surface of the crazy vastness of programs and libraries that Windows has.
Therefore, if many of the programs, libraries you use are not in a package manager, you are better off without one
</div></pre>
"""
nbSubSection "Nimble Package Manager"
nbText: """
We have already used a bit of `nimble` the default package manager bundled with all the recent Nim versions,
in the first "Nim SDL 2 Game Development for Beginners" video.
Now we will refresh that knowledge and expand upon it.
Nimble's repository is at "https://github.com/nim-lang/packages" with an overview at "https://nimble.directory/".
If a package is in that repository, you can simply install it with `nimble install desiredPackage`.
There are also packages that are NOT in nimble's repository, but instead on `github`.
Those require the installation of the `git` program from this link: [Git](https://git-scm.com/downloads "Git").
There is also the `github desktop` a graphical version of the `git` program,
if that is your preference [Github Desktop](https://desktop.github.com/ "Github Desktop").
"""
nbRawHtml: """
<pre><div style = "font-size: 10px">
Nimble also supports `Mercurial` repositories
https://nimpkgs.dayl.in/ another `nimble` repo
https://nimble.eu.org/ another `nimble` repo
</div></pre>
"""
nbSection "Nimble Basic Usage"
nbText """
The following are nimble commands that are required for basic usage of nimble:
- nimble update/refresh - to update the packages list
- nimble search - to find the desired module/program
- nimble install - to install the desired module/program and it's dependencies
- nimble uninstall
- nimble -h - for the full list of nimble commands
- you can also just type `nimble` and get the same
"""
nbSubSection "update/refresh"
nbRawHtml: hlhtml"""<img src = "images\nimbleUpdate.png">"""
nbRawHtml: hlhtml"""<img src = "images\nimbleRefresh.png">"""
nbText: """<h6>I am using the `nu` shell that works on all platforms</h6>"""
nbSubSection "search"
nbText: """
`nimble search` does not work with github urls
"""
nbRawHtml: hlhtml"""<img src = "images\nimbleSearch.png">"""
nbSubSection "install"
nbRawHtml: hlhtml"""<img src = "images\nimbleInstall.png">"""
nbText: """
The install command can be used in the following ways:
- nimble install - to install your own local package when inside of it's folder(top most level)
- Due note that any dependencies it may have, will be installed globally
- nimble install packageName
- `nimble install owlkettle`
- nimble install URLtoArepo
- `nimble install "https://github.com/nim-lang/atlas"`
- nimble install packageName@version
- `nimble install owlkettle@2.2.0`
- `nimble install owlkettle@>=2.2.0`
- `nimble install "owlkettle@>=2.2.0"`
- `nimble install owlkettle@#head - latest devel(development) version
- nimble install [package1, package2] - for multi package install
- `nimble install [c2nim, owlkettle]`
"""
nbSubSection "uninstall"
nbRawHtml: hlhtml"""<img src = "images\nimbleUninstall.png">"""
nbText: """
- nimble uninstall packageName
- nimble uninstall [pkg1, pkg2]
- `nimble uninstall [c2nim, owlkettle]`
"""
nbSubSection "-h or --help for help/manual"
nbRawHtml: hlhtml"""<img src = "images\nimbleHelp.png">"""
nbText: """This goes on for a bit"""
nbSubSection "Usage with github"
nbRawHtml: hlhtml"""<img src = "images\nimbleInstallGithub.png">"""
nbRawHtml: hlhtml"""<img src = "images\nimbleUninstallGithub.png">"""
nbSection "Creating Packages using Nimble"
nbSubSection "`.nimble` file structure"
nbText: """
All nimble packages end with `.nimble` file extension, and they all have a certain file structure,
of package information and dependencies.
**The following example showcases the `.nimble` file structure:**
"""
nbRawHtml: hlhtml"""<img src = "images\nimbleFileStructure.png">"""
nbSubSection "Checking, Installing and Uninstalling your own Packages"
nbText: """
Once you are inside the top level of your Package's folder(current working directory),
e.g. opening the first folder called MyPackage with VS Code,
or navigating to there with a command line/terminal,
you can then install your package by simply calling `nimble install`,
and to uninstall you can then use the name you chose for your package,
which will be the top most folder the package is in(current working directory), so in my case "MyPackage".
But before all that, there is a `nible check` command, that verifies the validity of your nimble package
"""
nbText: """**Check**"""
nbRawHtml: hlhtml"""<img src = "images\nimbleCheck.png">"""
nbText: """**Install**"""
nbRawHtml: hlhtml"""<img src = "images\nimbleInstallYourPackage.png">"""
nbText: """**Uninstall**"""
nbRawHtml: hlhtml"""<img src = "images\nimbleUninstallYourPackage.png">"""
nbSubSection "nimble init"
nbText: """
By typing `nimble init` when inside the top most level of your package(current working directory),
via VS Code or an external terminal, it will start a setup process to create a new package,
a new `.nimble` file, via prompts that will be asked of you,
like shown in the image below:
"""
nbRawHtml: hlhtml"""<img src = "images\nimbleInit.png">"""
nbText: """
The above will create the following folders and files:
"""
nbRawHtml: hlhtml"""<img src = "images\nimbleInitOutput1.png">"""
nbRawHtml: hlhtml"""<img src = "images\nimbleInitOutput2.png">"""
nbSubSection "Directory layout for library/module type packages"
nbText: """
There is a directory layout that library/module type `nimble` packages must follow.
if you wish to be able to import them in the following way `import mypackage/math/addition`(letter case does NOT matter here).
The directory structure must have a second folder named exactly the same as the package's
folder's name. In this example "MyPackage" is the name of the package and the folder,
which then has another folder of the same name to contain YOUR OWN modules for that package.
"""
nbRawHtml: hlhtml"""<img src = "images\nimbleDirectoryLayout.png">"""
nbText: """
**NOTE:** Nimble packages `.nimble`, like with `config.nims` configuration files,
use a subset of Nim's features in order to configure the package with code logic.
Make sure to use the export symbol `*` for the procs, data types, etc,
you want to be able to use directly from your main program.
"""
nbRawHtml: hlhtml"""<img src = "images\exportSymbol.png">"""
nbText: """
And now the desired import layout with the exported `sum` proc used
"""
nbRawHtml: hlhtml"""<img src = "images\importLayout.png">"""
nbText: """
`when isMainModule` will only run when this "myPackage.nim" is being compiled DIRECTLY,
and not from nimble or other nim files.
"""
nbSection "Compiling with Nimble vs Nim"
nbText: """
You can also use `nimble` itself to compile Nim files,
but it will not import any modules whose packages were not directly specified as a dependancy.
Only the Nim's Standard Library is the exception here.
This can very useful to be ran before publishing your package for the first time,
or updating it on Github, since it erroring,
will mean that if you were to publish or update your package without specifying dependencies,
the user of your package will receive a broken package.
"""
nbSection "Dependencies"
nbText: """
In order to add dependencies for your package so that it will run correctly for others,
or yourself on a different computer, you need to add them to the setting variable of,
`requires`, by appending additional dependencies as string(like an argument),
after the initial dependency of the version of Nim, like this:
"""
nbRawHtml: hlhtml"""<img src = "images\nimbleDependencies.png">"""
nbSubSection "Bleeding edge dependencies"
nbText: """
If you wish to use the current/latest development version(made with nimble develop) of a package,
in order to be on the bleeding edge, or help with the development of a package,
you can do this by adding `#head` after the name of the dependency in string,
like this:
"""
nbRawHtml: hlhtml"""<img src = "images\nimbleBleedingEdge.png">"""
nbSubSection "Unit Testing with Nimble"
nbText: """
I have not yet shown you the `unittest` module made specifically for testing code,
which is used by the Nim's developers and a lot of other Nim users, to have people contribute code,
and then if it passes trough the tests, is then considered mostly safe and ready to be integrated.
This is just one of the bigger use cases for the `unittest` module.
Nimble can run these tests for you via `nimble taskName`,
**but first you must add the following code to your `.nimble` file of your package:**
"""
nbCodeSkip:
task test, "Running myPackage's test":
exec "nim c -r tests/myTest.nim"
nbRawHtml: hlhtml"""<img src = "images\nimbleTask.png">"""
nbText: """
Once the `task` is set, we create the `tests` folder and in it `myTest.nim`,
with the following `unittest` code for a simple example:
"""
nbRawHtml: hlhtml"""<img src = "images\nimbleTaskCode.png">"""
nbText: """
Now, every `unittest` test, starts with the `suite` template that starts a block of our tests,
with a given name. Then inside it's block, we use the `test` template for our named tests,
and inside of these tests, we use the `check` macro for the logic.
If the condition inside the `check` macro is true, then the test passes with `[OK]`,
otherwise it fails with a `[FAILED]`, and before it the error message.
**Here is how the output looks like when the tests pass using the "nimble myTask", in our case `nimble test`:**
"""
nbRawHtml: hlhtml"""<img src = "images\nimbleTestOK.png">"""
nbText: """
**And here is how it looks like if one of the tests fails`(check(2 == 2) was changed to check(1 == 2))`:**
"""
nbRawHtml: hlhtml"""<img src = "images\nimbleTestFAIL.png">"""
nbSection "Sharing your package with Github"
nbText: """
In order for you to share your own packages so that others may find them and use them,
you will need to use a code sharing repository like Github.
Github is by far the most popular code sharing repository out there today.
There are of course some others, but since Github is so popular and Nim uses it for it's compiler etc,
we will use it as well.
"""
nbSubSection "Creating a Github account"
nbText: """
First things first, we will need to make Github account if you don't already.
So head on to the [Github's website](https://github.com/).
**And follow the instructions to create your account(enter an email into that field):**
"""
nbRawHtml: hlhtml"""<img src = "images\githubWebsite.png">"""
nbRawHtml: hlhtml"""<img src = "images\githubWebsite2.png">"""
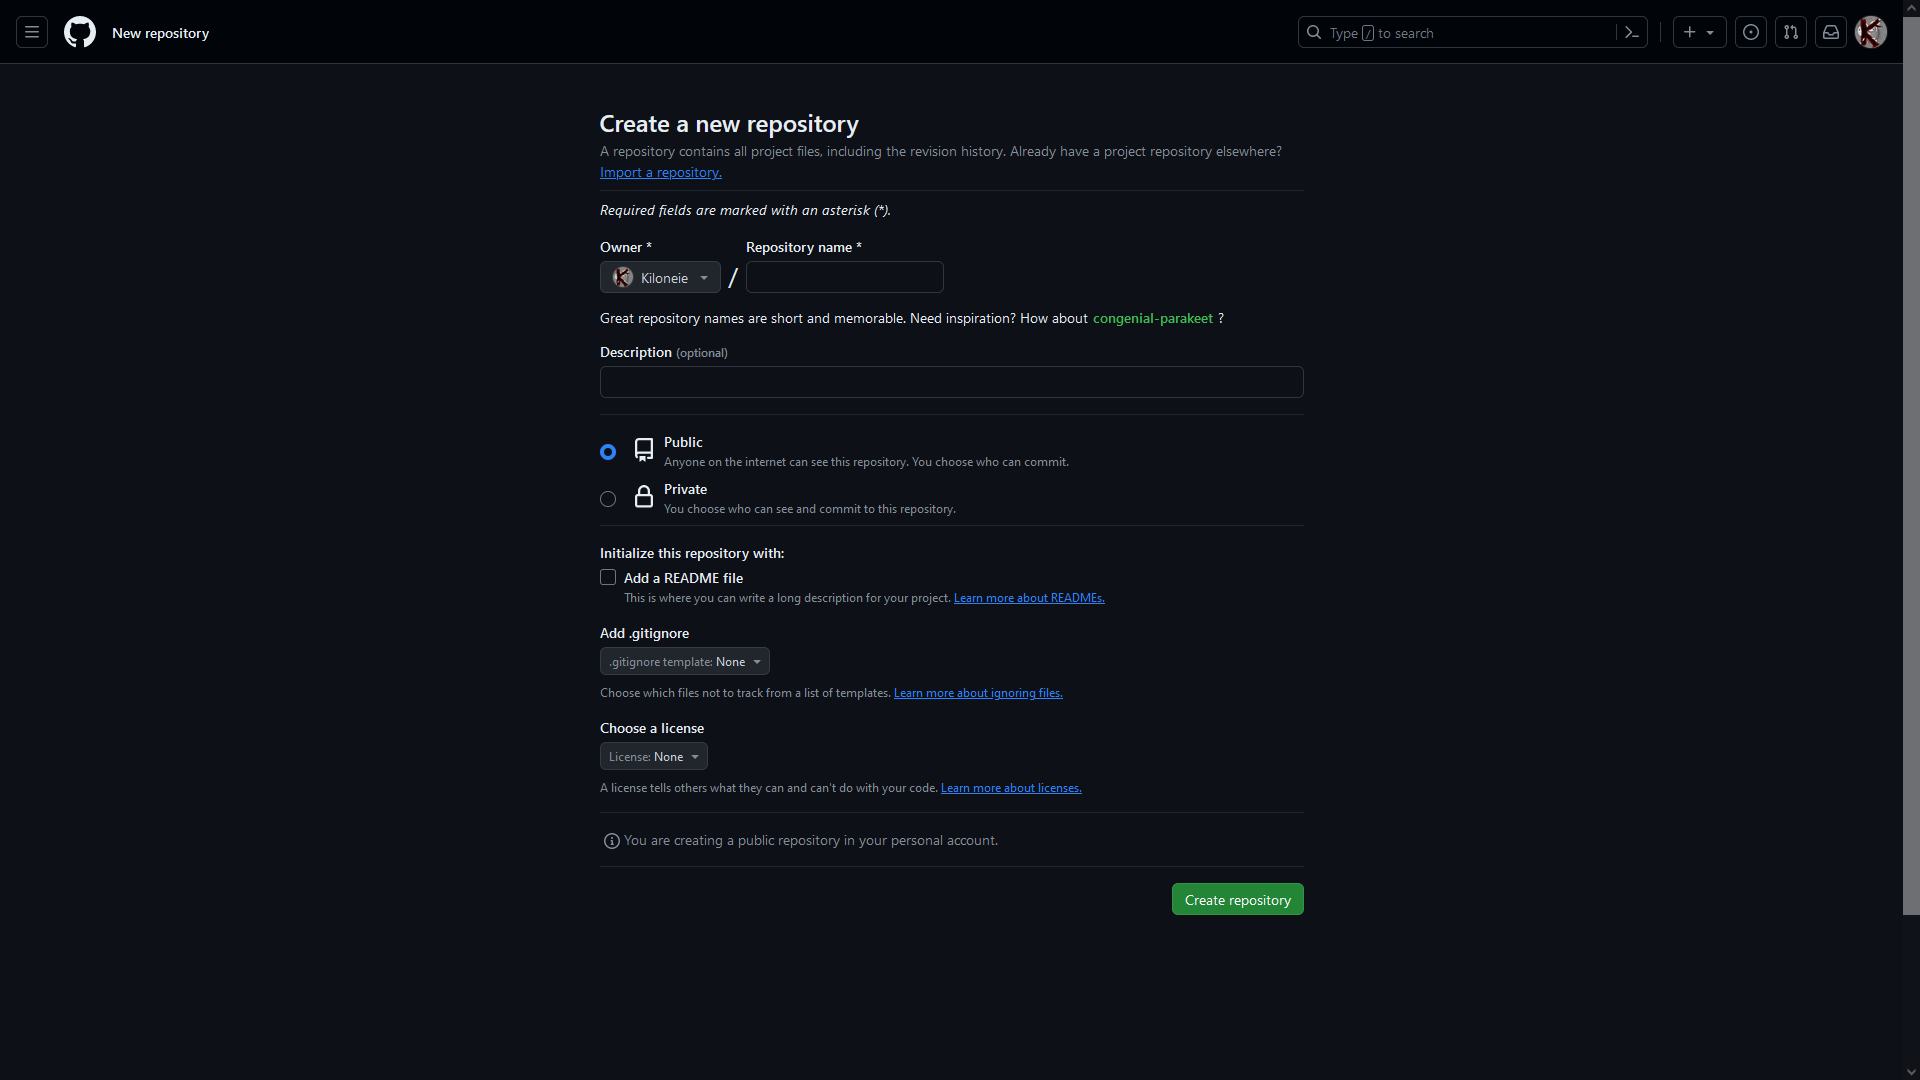
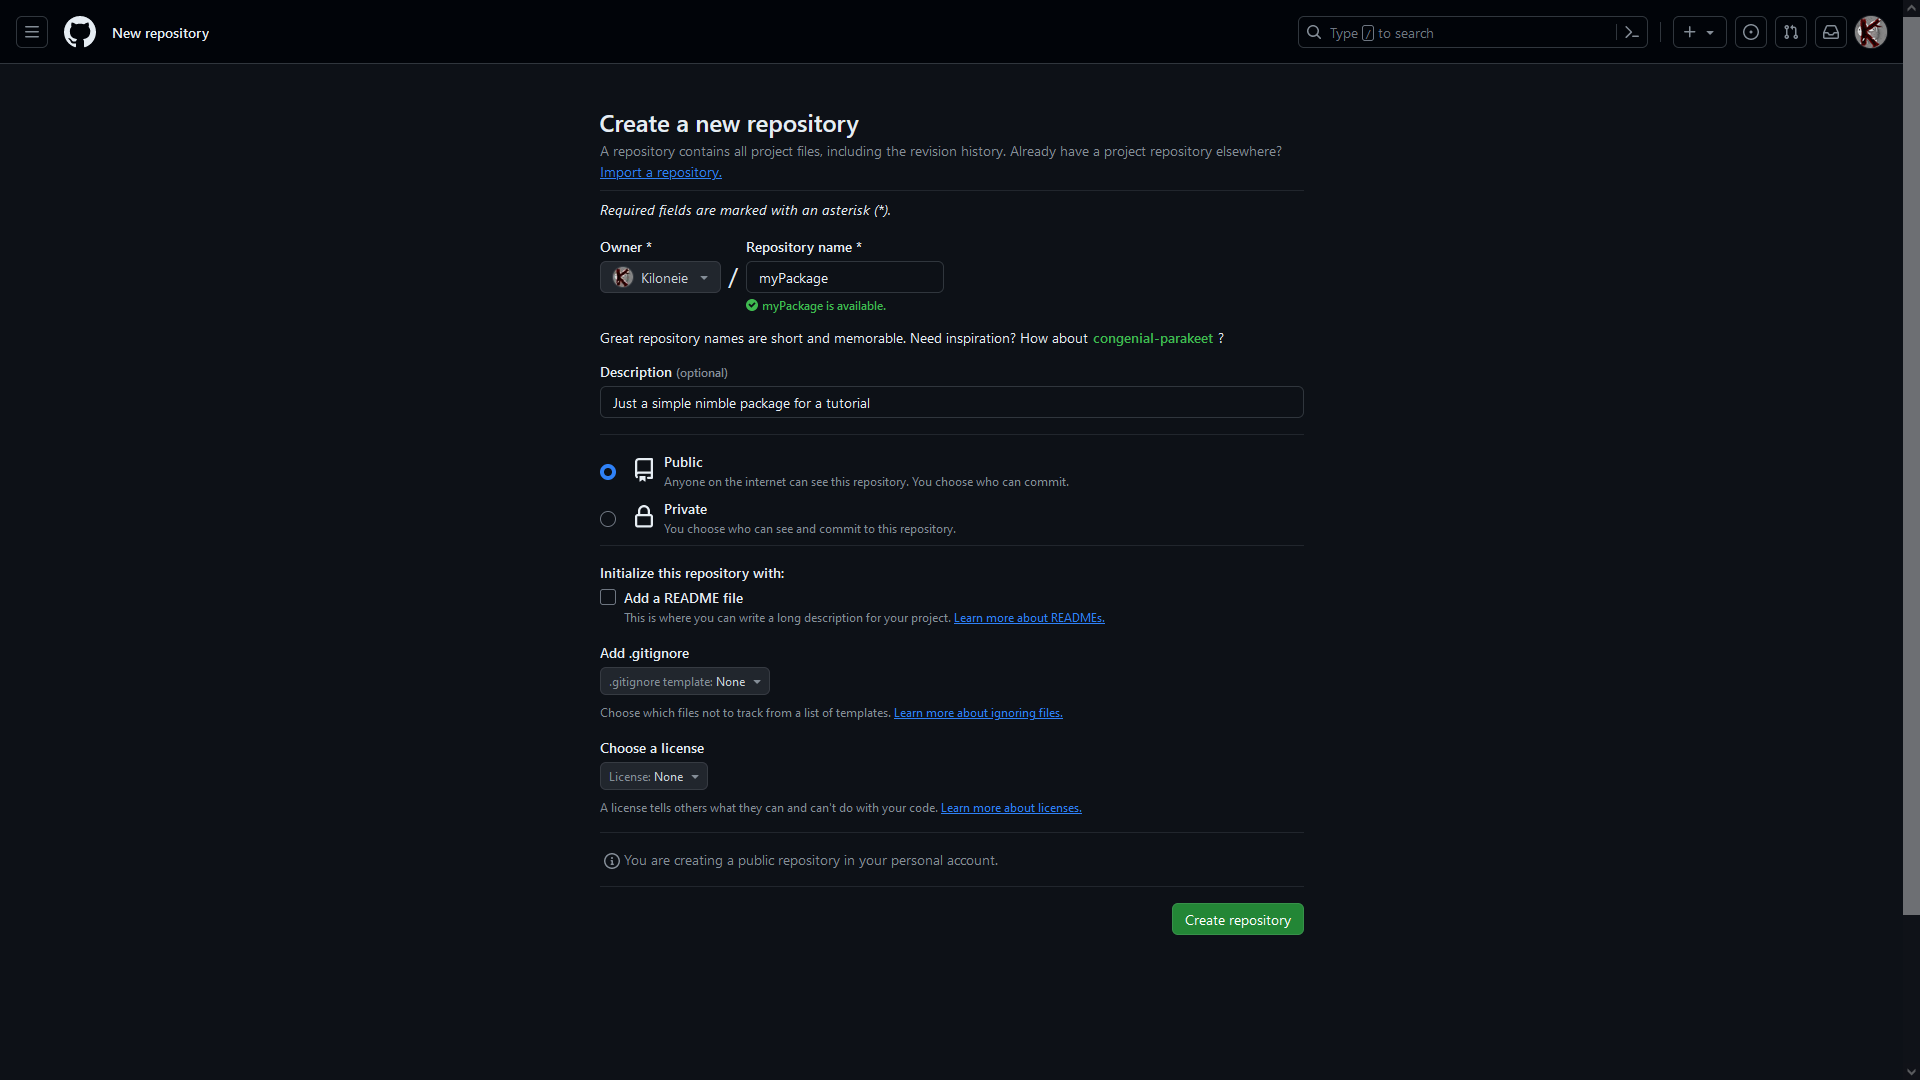
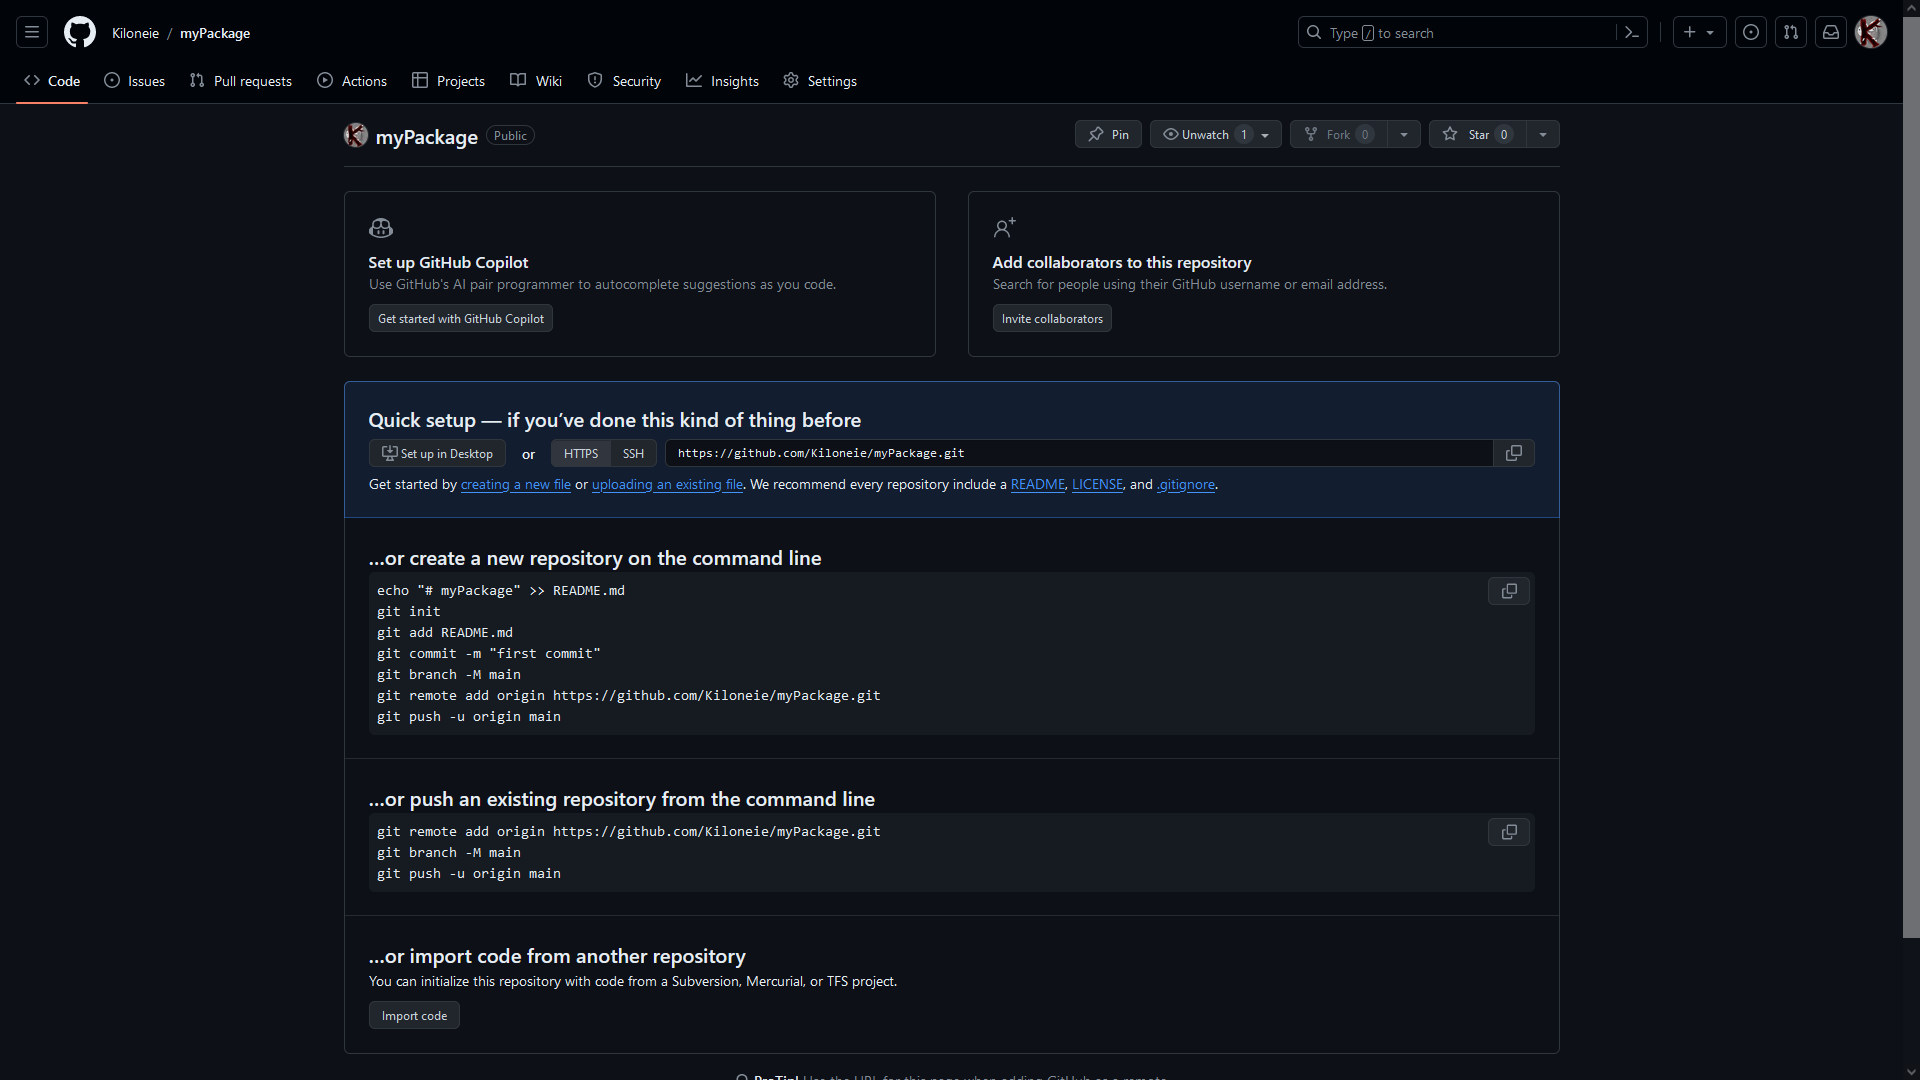
nbSubSection "Creating a Github repository"
nbText: """
Once you are done creating your Github account(or you skipped that part),
we will create a new Github repository for your package in the steps shown below:
"""
nbRawHtml: hlhtml"""<img src = "images\githubCreatingArepository.png">"""
nbRawHtml: hlhtml"""<img src = "images\githubCreatingArepository2.png">"""
nbRawHtml: hlhtml"""<img src = "images\githubCreatingArepository3.png">"""
nbRawHtml: hlhtml"""<img src = "images\githubCreatingArepository4.png">"""
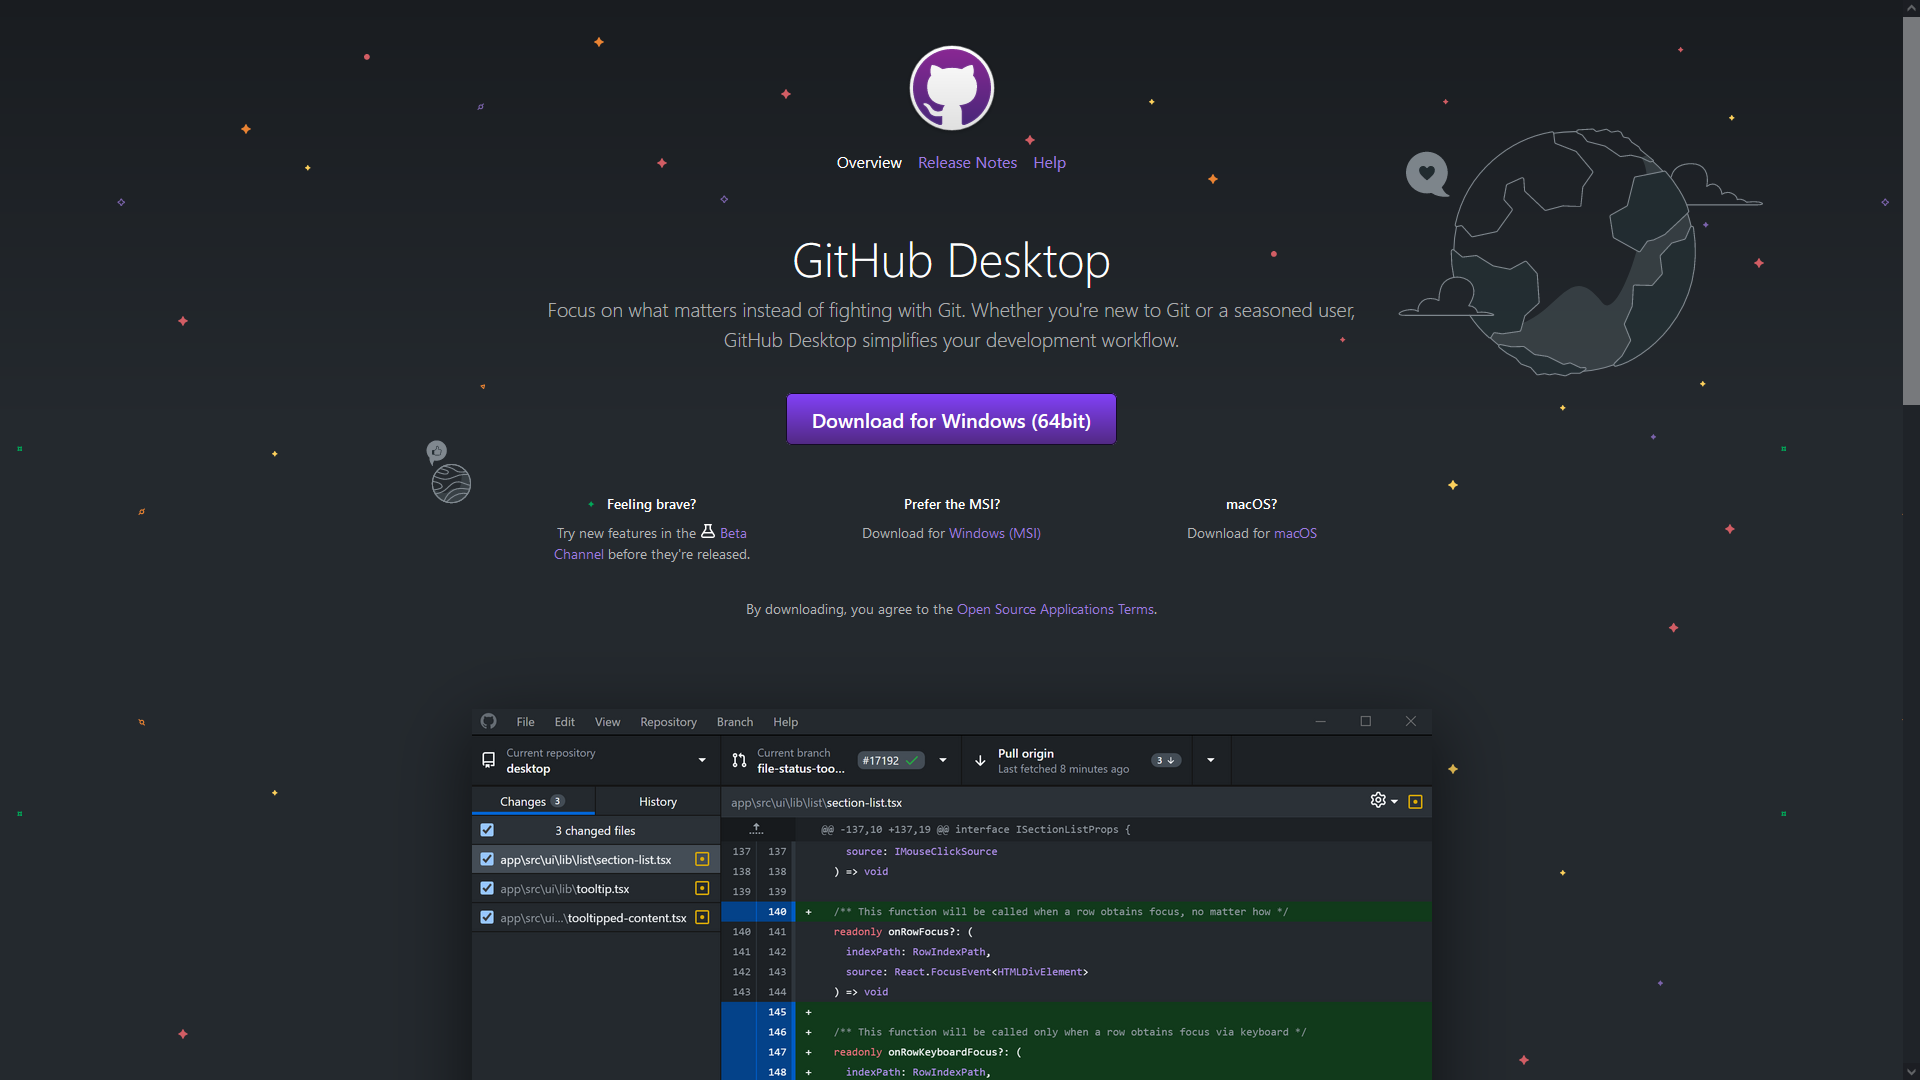
nbSubSection "Adding your package to your repository"
nbText: """
To add your package to your repository, you can do so using either `Git` commands,
or the `Github Desktop` graphical program.
We will use `Github Desktop` as it is much easier to use, and in my personal opinion,
much easier to navigate.
**So first off let's download and install it [Github Desktop](https://desktop.github.com/):** <br>
(It should also work on Linux, but i have not tested it)
"""
nbRawHtml: hlhtml"""<img src = "images\githubDesktop.png">"""
nbText: """
Clicking the `Download for Windows (64bit)`, will immediately start the download for you.
Go ahead and install it. Once done, it should either launch on it's own, or you should do it manually.
**Once open, you should see a similar window to the one below(i already have repositories added,
so it might be a bit different):**
"""
nbRawHtml: hlhtml"""<img src = "images\githubDesktop2.png">"""
nbText: """
You can also create a brand new repository using `Github Desktop` instead of using the `Github Website`,
like this:
"""
nbRawHtml: hlhtml"""<img src = "images\githubDesktop3.png">"""
nbRawHtml: hlhtml"""<img src = "images\githubDesktop4.png">"""
nbText: """
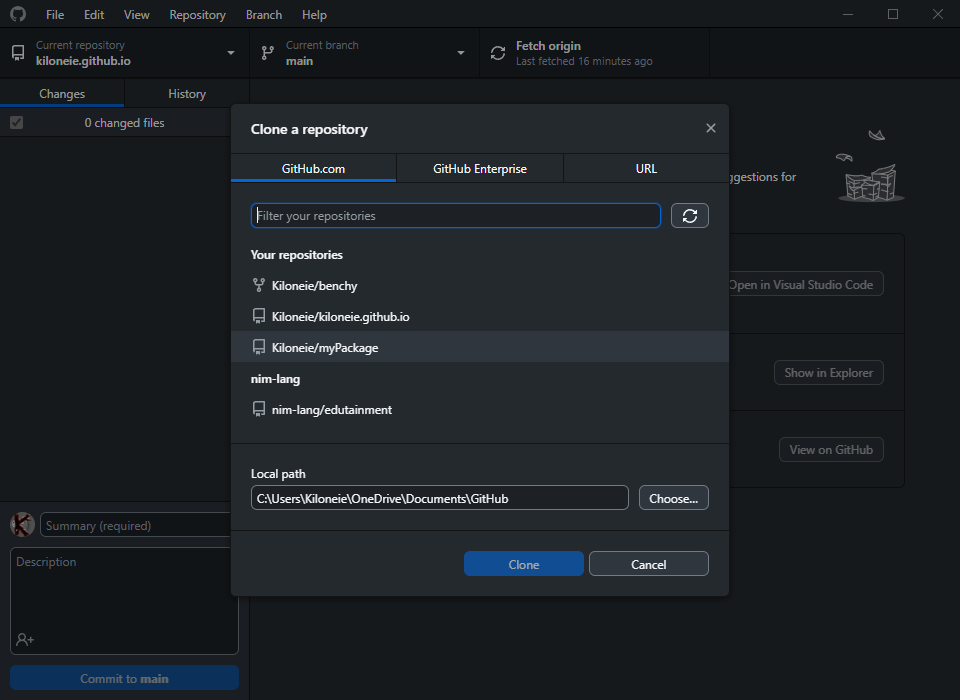
Now, since we have already made a repo using the `Github's Website`,
in order to connect the repository on Github with our `myPackage` folder and it's files,
**we have to `clone` the repository we have made on Github like this:**
"""
nbRawHtml: hlhtml"""<img src = "images\githubDesktop5.png">"""
nbRawHtml: hlhtml"""<img src = "images\githubDesktop6.png">"""
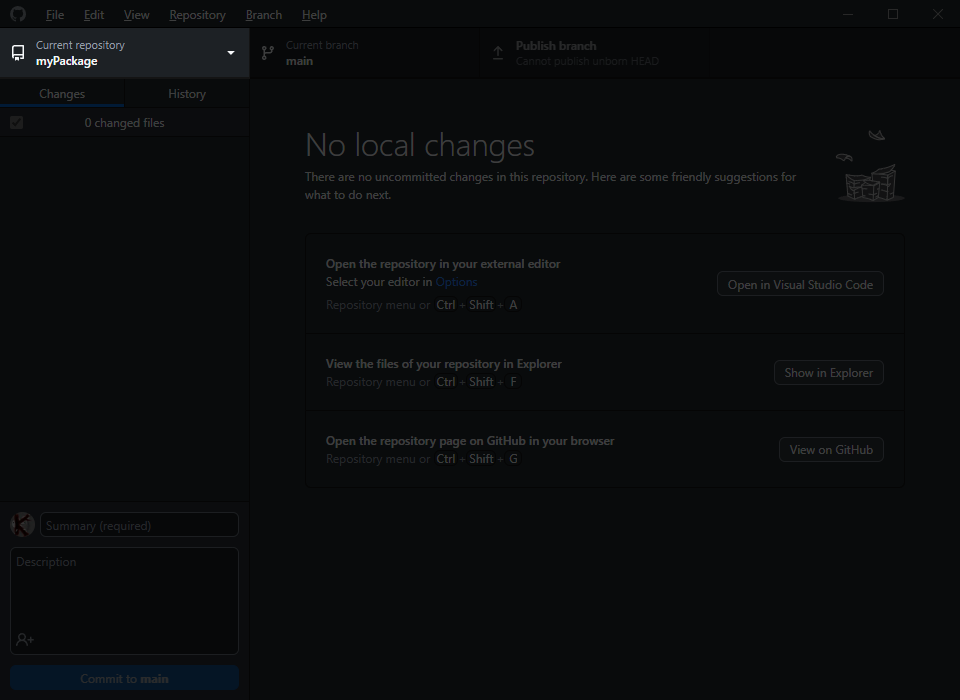
nbText: """
We are now inside our `myPackage` repository like seen in `Github Desktop` in the top left corner.
"""
nbRawHtml: hlhtml"""<img src = "images\githubDesktop7.png">"""
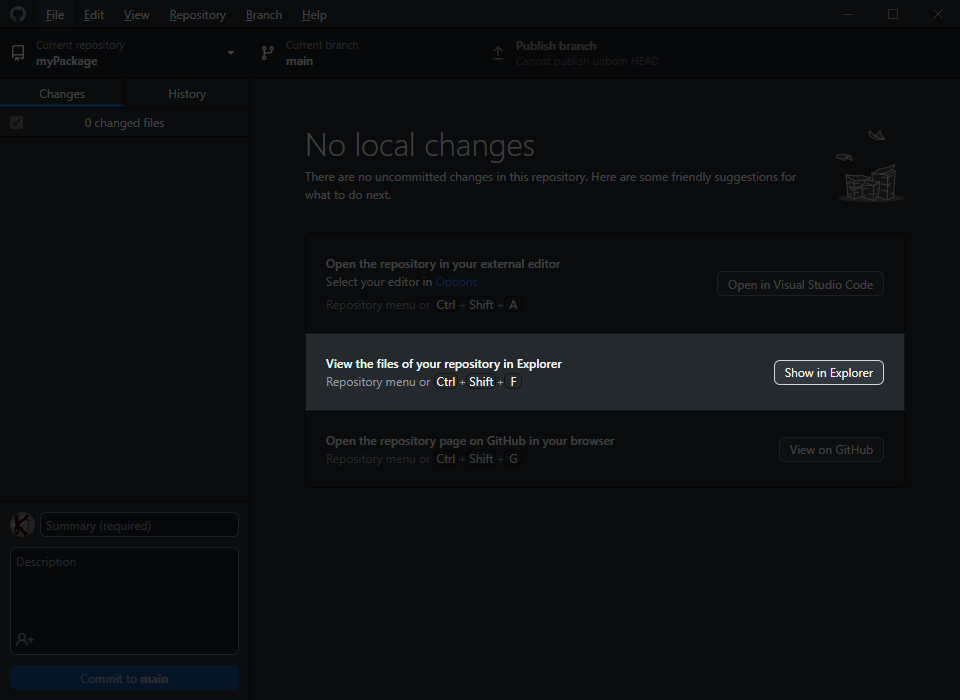
nbText: """
Now we have to add our folder of where we first made our `myPackage`,
into the repository's folder, which can easily be accessed by clicking the **following button:**
"""
nbRawHtml: hlhtml"""<img src = "images\githubDesktop8.png">"""
nbText: """
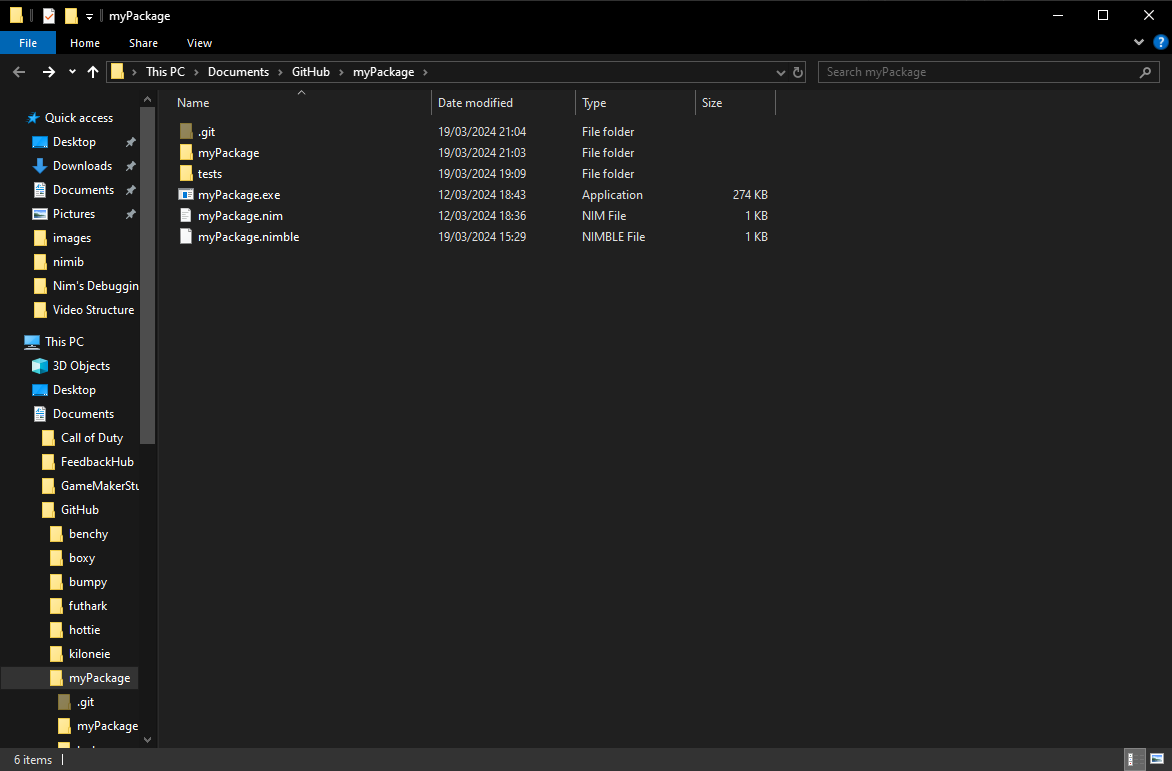
By copy pasting our `myPackage` folder into the repository's folder, like this:
<h6>(you should not see the `git` folder over there, i am seeing it because i enabled seeing HIDDEN files)</h6>
"""
nbRawHtml: hlhtml"""<img src = "images\githubDesktop9.png">"""
nbText: """
Will cause `Github Desktop` to immediately detect the changes like this:
"""
nbRawHtml: hlhtml"""<img src = "images\githubDesktop10.png">"""
nbText: """
Now what we have to do is, commit these changes to the `main` and only current branch of our repository,
by first giving a `summary`/title with a description, which once commited and pushed to origin,
will be stored on Github as information for you and others if you made your repository public.
This information can be quite helpful, and Github will store all changes to the repository WITH these descriptions,
which you can then easily view once pushed to Github, more on that later.
**So let's give our changes some simple information and click the blue button of `Commit to main`:**
"""
nbRawHtml: hlhtml"""<img src = "images\githubDesktop11.png">"""
nbText: """
Now the changes are commited, but we still need to upload them to Github,
by clicking the `Publish branch`(if you already have a branch on your repository, the button will instead read,
`Push to origin`).
If the changes were pushed to origin/uploaded successfully, you should see the initial Github Desktop window,
**like this:**
"""
nbRawHtml: hlhtml"""<img src = "images\githubDesktop12.png">"""
nbText: """
And with that, you should see the following on your `Github repository`:
"""
nbRawHtml: hlhtml"""<img src = "images\githubDesktop13.png">"""
nbText: """
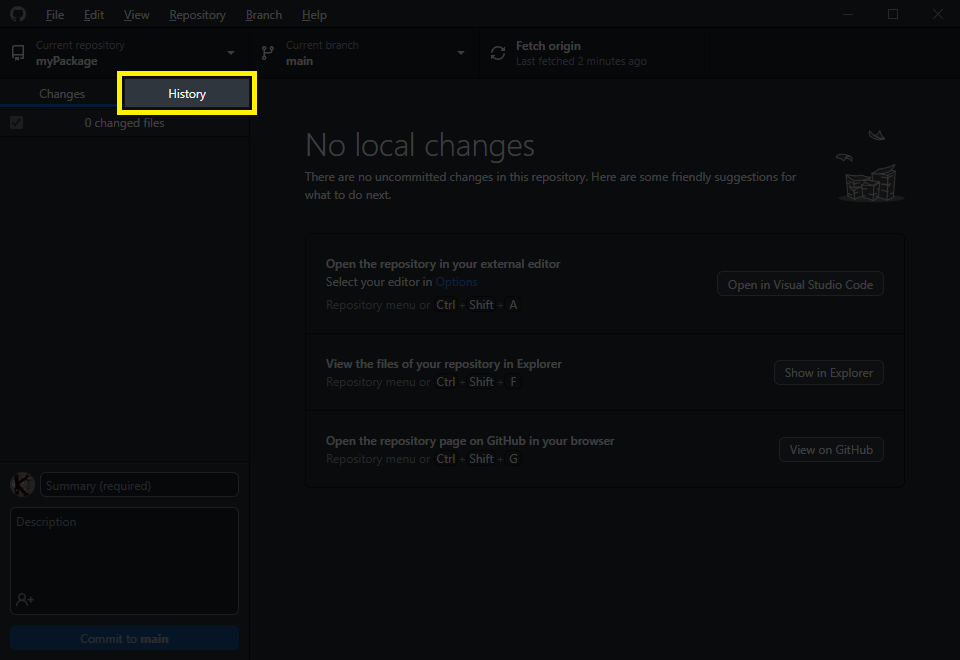
There is one last thing i want to show you about Github Desktop,
the `History` tab.
"""
nbRawHtml: hlhtml"""<img src = "images\githubDesktop14.png">"""
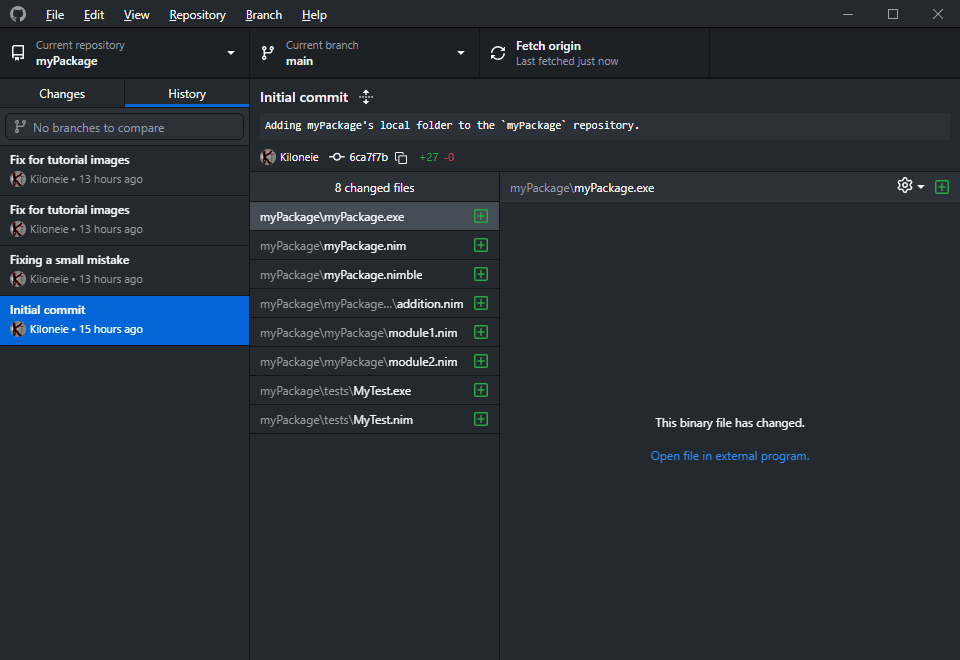
nbText: """
By clicking it, you should see something similar to the following:
"""
nbRawHtml: hlhtml"""<img src = "images\githubDesktop15.png">"""
nbText: """
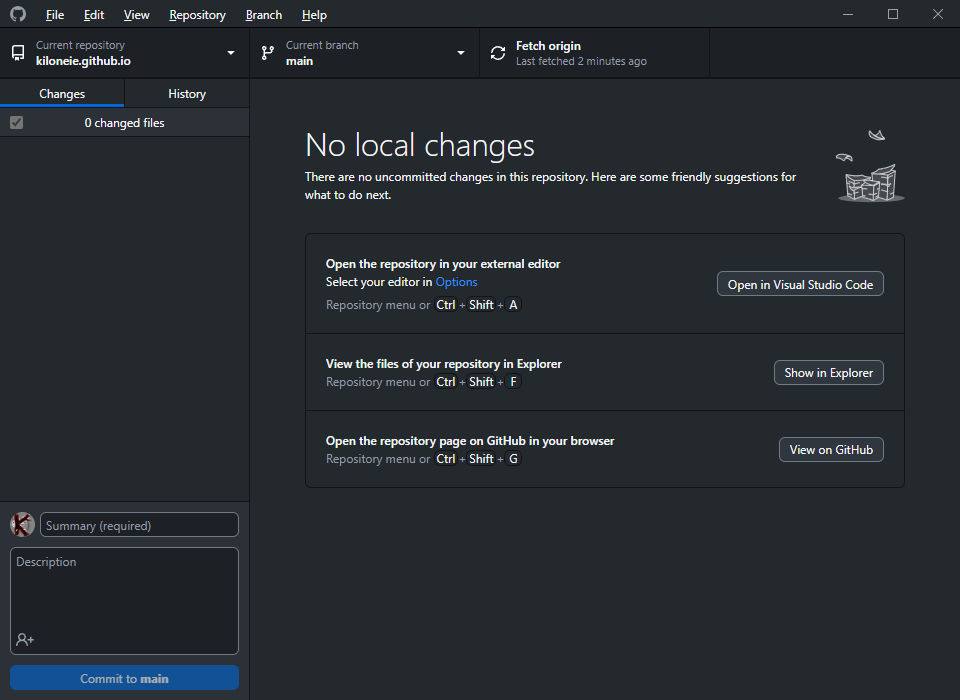
Here is where you can view ALL of your commit history for your package's Github repository.
"""
nbText: """
By the way, when opening `Github Desktop`, on the right side of it, you get the options of `Open in Visual Studio Code`,
`Show in Explorer` and `View on Github`. These get hidden when changes to your package's repository get detected.
To find them again, right click on the `Current repository yourRepository` in the top left corner,
and you will get those options back.
"""
nbRawHtml: hlhtml"""<img src = "images\options.png">"""
nbRawHtml: hlhtml"""<img src = "images\options2.png">"""
nbSubSection "Git Lens"
nbText: """
I HIGHLY recommend installing the `Git Lens` Visual Studio Code Extension,
which adds a TON of functionality to make your life much easier when working on your own Github repositories,
and repositories made by others.
Watch the following video for a nice intro of it's features: [Git Lens Intro/Showcase](https://www.youtube.com/watch?v=UQPb73Zz9qk)
"""
nbSection "Publishing your package to Nimble's repository"
nbSubSection "Publishing by opening a Pull Request"
nbText: """
In order for you package to be found by other Nim users using Nimble,
you will have to `publish` your package to Nimble's repository,
by either manually going to [github.com/nim-lang/packages](https://github.com/nim-lang/packages),
and opening a `pull request` in the top left:
"""
nbRawHtml: hlhtml"""<img src = "images\githubPullRequest.png">"""
nbText: """
Read about pull requests if you don't know about them yet here [Pull Requests](https://docs.github.com/en/pull-requests/collaborating-with-pull-requests/proposing-changes-to-your-work-with-pull-requests/about-pull-requests)
"""
nbSubSection "Publishing using `nimble publish`"
nbText: """
There is also option 2 of using `nimble publish` from inside your local copy of your package's repository.
If you go with the `nimble publish` you will then get instructions to follow.
"""
nbRawHtml: hlhtml"""<img src = "images\nimblePublish.png">"""
nbRawHtml: hlhtml"""<img src = "images\nimblePublish2.png">"""
nbText: """
**Follow the instructions to completion.**
Once you have finished those instructions, it will make things much easier in the future.
You will then have to wait for someone to verify your package and change things if necessary.
Once your package is in the repository, you will no longer need to `publish` it ever again.
Instead all you will have to do, is make a new version, tag it, and commit it to Github.
The following link contains a very useful guideline for versioning,
that you should read when making a package that you intend to continue developing for a long time:
[Semver/Semantic Versioning](https://semver.org/).
"""
nbSubSection "Adding a new version of your package"
nbText: """
When creating a new version of your package,
you will have to do a few steps so that `nimble` will be able to find it.
The first thing you will have to do is **increment the `version` of your `.nimble` file:**
"""
nbRawHtml: hlhtml"""<img src = "images\packageNewVersion.png">"""
nbText: """
Once that is done, you will have to `commit` this change to your Github repository via `commit changes`,
like i have shown you earlier via `Github Desktop`,
WITHOUT `push to origin` to upload them, as they are not yet ready to be uploaded.
Then step 2 is to tag this version once it was succesfully commited, NOT uploaded via `push to origin`.
This is done with either Git commands like shown in the following link: [Git Tagging](https://git-scm.com/book/en/v2/Git-Basics-Tagging),
or with Github Desktop like shown in the following link: [Github Desktop Tagging](https://docs.github.com/en/desktop/managing-commits/managing-tags-in-github-desktop).
Once that is done, you upload these changes via `push to origin` button in Github Desktop.
(with Git it would be something like: git push origin master --tags).
Once the changes are visible on Github(it takes a minute),
Nimble should be able to find your new version of your package.
"""
nbSection "Some more useful commands"
nbText: """
Do we have enough ? I think so ...
"""
nbSection "Cons of Nimble TO INCLUDE OR NOT ?"
nbText: """
This and the next section is probably the subject of a future video.
"""#Often lies about it's dependencies, demands a specific folder structure
nbSubSection "Atlas Package Cloner TO INCLUDE OR NOT ?"#Not yet production ready, might replace nimble in the future, doesn't have the problems nimble has,#with lying about dependencies -> e.g. requires x,y,z, but then it also requires a, b...
nbUoSection "Outro - Afterwords"
nbText: """
Okay, that's it for this video, thanks for watching like, share and subscribe,
aswell as click the bell icon if you liked it and want more,
you can also support me on Patreon.
If you had any problems with any part of the video,
let me know in the comment section,
the code of this video, script and documentation, are in the link in the description,
as a form of written tutorial.
"""
nbUoSection "Thanks to my past and current Patrons"
nbUoSubSection "Past Patrons"
nbText: """
- Goose_Egg: From April 4th 2021 to May 10th 2022
- Davide Galilei(1x month)
"""
nbUoSubSection "Current Patrons"
nbText: """
- jaap groot (from October 2023)
- Dimitri Lesnoff (from October 2023)
"""
nbUoSubSection "Compiler Information"
nbText: """
- Version used: 2.0.2
- Compiler settings used: none, ORC is now the default memory management option(mm:orc)
"""
nbUoSubSection "My and General Links"
nbText: """
- [Patreon](https://www.patreon.com/Kiloneie?fan_landing=true "Patreon")
- [Visual Studio Code Shortcuts](https://code.visualstudio.com/shortcuts/keyboard-shortcuts-windows.pdf "Visual Studio Code Shortcuts")
"""
nbUoSubSection "Links to this video's subject:"
nbText: """
- [Git](https://git-scm.com/downloads "Git")
- [Git explanation](https://tom.preston-werner.com/2009/05/19/the-git-parable.html "Git explanation")
- [Github Desktop](https://desktop.github.com/ "Github Desktop")
- [Git Lens Intro/Showcase](https://marketplace.visualstudio.com/items?itemName=eamodio.gitlens)
- [If you want to use Semantic Versioning, read this](https://semver.org/ "Semver")
- [Nim in Action Chapter 5. Package management(paid book)](https://livebook.manning.com/book/nim-in-action/chapter-5/ "Nim in Action Chapter 5. Package management(paid book)")
- [Nimble package manager - with more detailed information on commands i have not covered](https://github.com/nim-lang/nimble "Nimble package manager")
- [Atlas package cloner](https://github.com/nim-lang/atlas "Atlas package cloner")
"""
nbSave()