Prerequired knowledge: Up to and including: Nim for Beginners List Comprehensions with sugar.collect vs Python's List Comprehensions
INTRO - FOREWORDS
(What is the purpose of this video ?)
Metaprogramming in Nim Essential Knowledge:
This video will teach you about some of the most useful and required things about Metaprogramming in Nim,
in order for you to be able to metaprogram on your own.
The code for this video and it's script/documentation styled with nimib,
is in the link in the description as a form of written tutorial.
1. dumpAstGen
In the first introductory video, i have shown you the dumpTree macro,
which outputted the given code as a description of the code in a tree format,
which gave you the idea on how the macro code has to be structured to get the result we want.
But as the title of this section suggests, there is also the dumpAstGen macro,
which does not output the description of the code given,
but macro code that you can directly insert into a macro.
1.1. stdout.writeLine
Here is an example of using the dumpAstGen macro with stdout.writeLine:
It works! But it is very long, unreadable and complex.
But since it works, this will enable you to dissect and play with any Nimcode.
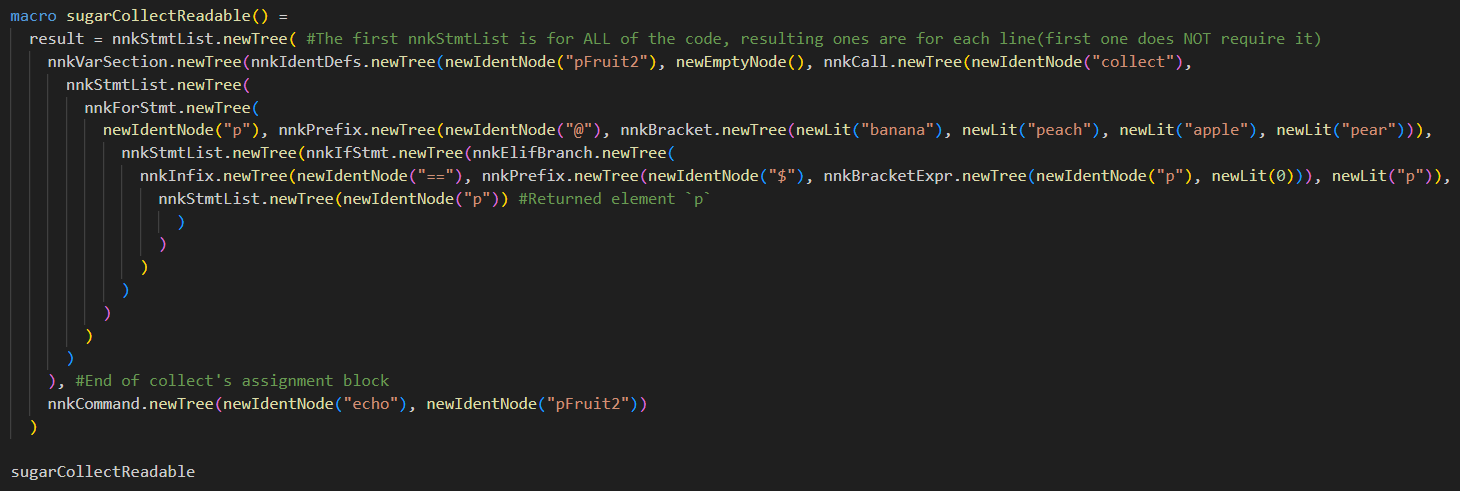
Here is my attempt to make it more readable in order to explain,
all the different nodes and such seen in that outputted code:
(best viewed in VS Code)
dumpAstGen:
var pFruit2 = collect:
for p in @["banana", "peach", "apple", "pear"]:
if $p[0] == "p":
p
echo pFruit2
macro sugarCollectReadable() =
result = nnkStmtList.newTree( #The first nnkStmtList is for ALL of the code, resulting ones are for each line(first one does NOT require it)
nnkVarSection.newTree(nnkIdentDefs.newTree(newIdentNode("pFruit2"), newEmptyNode(), nnkCall.newTree(newIdentNode("collect"),
nnkStmtList.newTree(
nnkForStmt.newTree(
newIdentNode("p"), nnkPrefix.newTree(newIdentNode("@"), nnkBracket.newTree(newLit("banana"), newLit("peach"), newLit("apple"), newLit("pear"))),
nnkStmtList.newTree(nnkIfStmt.newTree(nnkElifBranch.newTree(
nnkInfix.newTree(newIdentNode("=="), nnkPrefix.newTree(newIdentNode("$"), nnkBracketExpr.newTree(newIdentNode("p"), newLit(0))), newLit("p")),
nnkStmtList.newTree(newIdentNode("p")) #Returned element `p`
)
)
)
)
)
)
)
), #End of collect's assignment block
nnkCommand.newTree(newIdentNode("echo"), newIdentNode("pFruit2"))
)
sugarCollectReadable
@["peach", "pear"]
VS Code image to see all of the code at once
2. Explanations of all the NimNodes used with sugar.collect
2.1. nnkStmtList
To me, this is now much more readable and understandable,
since the parts that should be on the same line, are now on the same line.
Now first of, the nnk you see at the start of every statement,
is read as nim node kind. So this macro starts with nim_node_kindStatementList.
nnkStmtList is a kind of a NimNode for containing multiple statements, other NimNodes.
In the above example it represents a line of code.
The first nnkStmtList is for ALL of the code captured by the dumpAstGen.
The resulting ones/the next ones are for each line of code,
with the first one not requiring one.
2.2. nnkVarSection
nnkVarSection means either a variable with var,
or a code section with var, like how you declare objects, enumerators, optionally tuples, etc like this:
var
a = 1
b = 0.5
2.3. .newTree
Appending .newTree to a nnkStmtList or nnkVarSection is how one adds code to something, as in append it as a container of child nodes.
For example, using .newTree with the nnkVarSection, you will then add the nnkIdent identifier,
the name of the variable you are making, followed by the value if initializing or the type if declaring,
or both if declaring with initialization(useful for Tuples).
2.4. nnkEmptyNode
The nnkEmptyNode is used and present, whenever a value or a type is not explicitly declared and or initialized.
Just like when we write our code normally, the compiler can infer the type from the value.
Here is an example of all 3, which will show just that:
Here is my explanation of the above: variableName as declaredType of someValue,
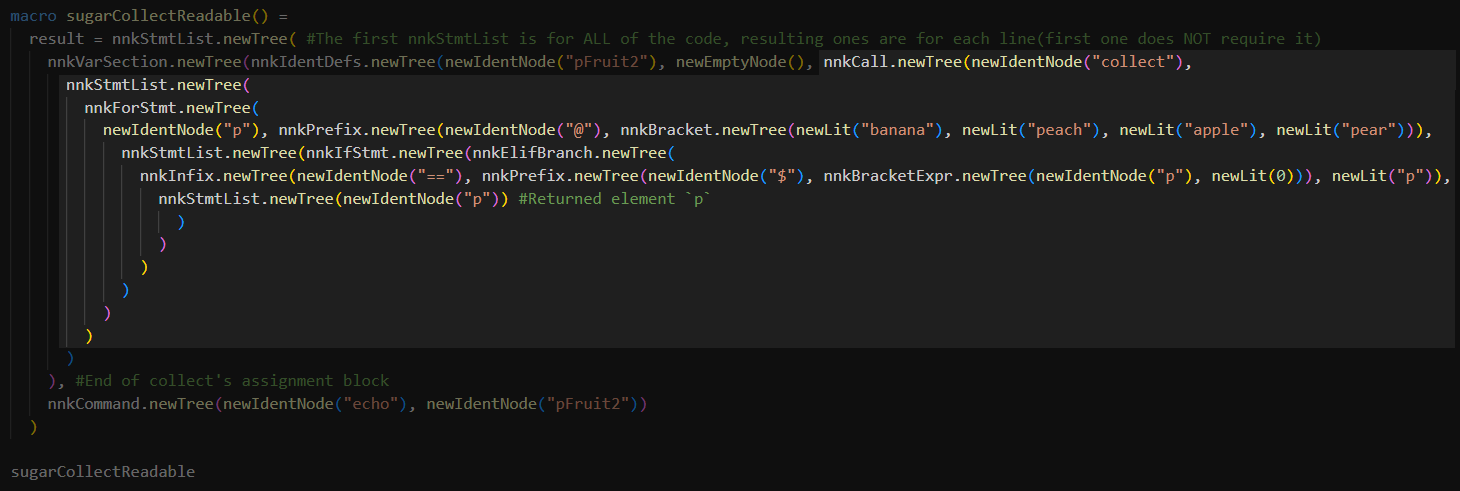
and so the collect's example of the dumpAstGen's first line then reads as follows:
pFruit2 as noTypeDeclared of collect -> nnkCall(calls a proc, func, iterator, macro, etc)
And since collect uses whatever logic/a body you want, to collect the elements for a container,
that nnkCall doesn't end at the end of that line, but at the end of all the logic for collect,
here is an image to illustrate:
dumpAstGen:
var pFruit2 = collect:
for p in @["banana", "peach", "apple", "pear"]:
if $p[0] == "p":
p
echo pFruit2
2.6. nnkForStmt
This one is simple, it's a for loop, that then gets .newTree appended to it,
which then contains the structure/head of the for loop, e.g. for element in container:.
2.7. nnkPrefix
newIdentNode("p") being the first node of the nnkForStmt.newTree is the identifier for the element,
for p.
Then we get to nnkPrefix with .newTree appended to it, will hold the following:
newIdentNode("@") the symbol used to indicate that we mean a sequence and not an array,
which is then followed by the nnkBracket.newTree which then holds all the elements we gave it,
of type newLit short for literal, which is a proc that generates a new NimNode of some Nim's data type like integer and string.
2.8. nnkIfStmt,nnkElifBranch and nnkElse nodes
To best explain this, let's use dumpAstGen on a simple if statement:
dumpAstGen:
if1 == 1:
echo"1 == 1", " is true"else:
echo"1 is not 1"
And lastly, the third part is the else statement with it's body.
It doesn't require 2 parts like the if statement, because it doesn't have a condition,
it's an else statement, so it's condition comes from the if statement's condition not being met.
nnkElse.newTree(
nnkStmtList.newTree(
nnkCommand.newTree(
newIdentNode("echo"),
newLit("1 is not 1")
)
)
)
)
)
Like with all AST, all of the code from the output of the dumpAstGen macro,
starts with a nnkStmtList.newTree for the entire block.
Then comes nnkIfStmt.newTree which ends right before the starting statement list does.
Then comes the nnkElifBranch.newTree which will be present for every if, elif and else statements,
it marks the branch/scope of that conditional statement.
Same level connected conditionals share the same nnkElifBranch.
So if you were to nest inside that if statement another if statement,
another nnkElifBranch would be called/started there.
Here is an example of an if statement inside an if statement:
dumpAstGen:
if0.5 == 0.5:
echo0.5if0.5.typeis"float":
echo"0.5 is a float"
(Starting example)
Then inside the first nnkElifBranch.newTree comes nnkInfix for the comparsion of 1 == 1.
And like before all variable names and operators,
the equals operator == requires an identifier node newIdentNode, followed by 2x newLit, literal nodes.
Assignment and for loops don't require an identifier node for in and =, this is probably some compiler magic.
Then after the nnkInfix.newTree ends, separated with a comma ,, comes the body of the if statement.
For the echo to actually do something, it has to be inside either a nnkCommand node's newTree,
or inside a nnkCall's .newTree. In this case it is a nnkCommand node,
with 2x newLit nodes, 1x for each of the echo's arguments.
You might have noticed that the newLit nodes are used for both numbers and strings.
This is again, because it is a overloaded proc that returns a NimNode of some kind.
And also, since this is an echo call which stringifies it's arguments,
there is no need for any more specific node kind, which might be required if you are trying to do something more specific.
Just as a reminder newIdentNode is used for variable names, proc names, etc. An identifier is the name of the group var, let and const belong to.
And lastly, part 3 simply starts with nnkElse.newTree with another nnkStmtList.newTree for the body of the else statement,
with an identifier node and it's argument newIdentNode("echo"), newLit("1 is not 1").
2.9. nnkNone
nnkNone is an erroneous or invalid kind of a NimNode.
If you get an error message stating that, it means you did something wrong and need to fix it.
3. Debugging at compile-time
When we used the dumpAstGen it outputted the AST of the block of code we gave it in the output tab in VS Code.
Now if we enable VS Code's autosave feature, which you should have enabled for Nim already, it saves the Nim file after every single key stroke.
And with that, the output gets outputted everytime we save the file with a timestamp.
Now this can be very useful to see the changes when constructing a Macro,
if you put some echoes inside a Macro, which will then constantly update.
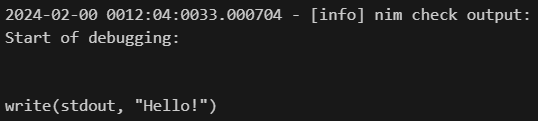
3.1. stdout.write
Here is an example of constructing a stdout.write "Hello!":
macro testMacro() =
result = newNimNode(nnkStmtList)
echo"Start of debugging: "echoresult.repr
result.add newCall("write", newIdentNode("stdout"), newLit("Hello!"))
echoresult.repr
Output:
Again, the above output will constantly update
3.2. repr proc
We have used repr before in my videos, but before now it wasn't exactly all that useful or required.
But when working with Macros, it is mandatory for usage with the echo proc,
because everything inside a Macro that isn't specifically declared/initialized as a data type that is NOT a NimNode,
will be a NimNode. This is why i have used the repr proc in the above subsection,
without it, we cannot even compile as we will get an error.
3.3. static statement
In a previous video we have used static to make a data type be known at compile-time with the static keyword.
There is also the static statement, which takes a block of code and treats it as compile-time.
This can be very useful for writting code that should execute at the compilation of the program,
for example to determine the operating system the user of the program is running on,
which can then be used to have different behaviour based on the OS/operating system.
Here is an example:
static:
ifdefined windows:
echo"The OS is Windows"
This will output "The OS is Windows" in the output tab.
And here is a version using the when compile-time version of the if statement i have shown long ago:
whendefined windows:
echo"The OS is Windows"
The OS is Windows
This will echo "The OS is Windows" at runtime in the terminal,
because when defined windows will be checked at compile-time,
while the echo "The OS is Windows, will be displayed at runtime.
Now back to the static statement.
To demonstate better how the static statement can be used for faster debugging,
here is a better example:
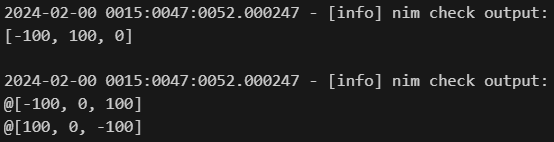
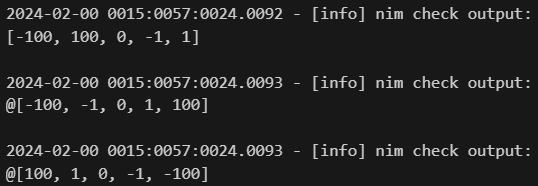
The reason there are 2x timestamps in the output, is because we are using echo 3x times,
to fix this, simply put all the data you want outputed in a single `echo` call with `\n` for newlines.
The reason i used the let keyword instead of var and sorted procs which return a new copy instead of sort which modifies the existing container,
is because all the values/data you are working on at compile-time, must be known at compile-time.
We could of also used var above, and if you do not change it, it will work.
But using let is to better demonstrate that you should not change it.
const is the much prefered keyword to be used for "identifiers" at compile-time,
which doesn't need to be inside a static block if you use it with other compile-time statements like the when statement.
Now, if you were to change the elements of our seqNumbers sequence, the output will be updated immediately without having to compile.
This has the potential to save you quite a bit of time, if you like to tinker a lot, and or the code takes a while to compile(long programs).
4. More Metaprogramming Essentials
4.1. Parsing Nimcode
If we use a Macro with an argument, that argument can be a body of valid Nim Code,
which the Macro will receive as a NimNode, which can then be turned into string with the repr proc for debugging.
Which can then also be parsed with the parseStmt for multiple lines of code, and parseExpr for a singular line of code.
You should only do this if you already have some valid Nim code in the form of a string,
you should NOT use strings to generate new Nim code, domain specific languages etc.
Here is an example of taking a block of code into a Macro, and then parsing it in order to execute the given code:
macro executeCode(code: untyped) =
result = code.repr.parseStmt
echoresult.repr #the same as running this before `.parseStmt`
executeCode:
var a = 10echo a
10
Output of echo result.repr:
As you can see the code is captured whole as a block.
4.2. Parsing Nimcode use case
Whenever you want to extract some specific data from a string, e.g. a number and then use it like a number would be used, you first need to parse it like we have done in the past.
[In case it is NOT clear]
A "parser" is NOT a "compiler". A parser translates/converts string into AST which is then passed to a compiler that then compiles to machine code, which can then be executed.
In Nim's case it compiles to the "c" programming language first, which then get compiled via a "c" compiler like the "gcc" that Nim uses by default.
I am saying this, for the reason of dissuading you from using parsing of `parseExpr` and `parseStmt` to generate Nim code.
A concrete example and use case of using "strings" to generate code, is the Nim's Playground, which i have used in the past to share the code of my videos.
So if you already have existing valid code, like the code one writes on the Nim's Playground, you will use a parsing proc like parseExpr for singular and parseStmt for multiple code statements.
For every other code generation like a domain specific language, some new behaviour you want to use, etc, you will use Nim Nodes like at the start of this tutorial,
because it has a known, well defined structure, which makes it easier to generate new code, with introspection(logic) and be less error prone.
It's hard to find an error in a string.
Now if you are in need of this use case, you can use the strformat module to get procs and the like, to greatly help you with that.
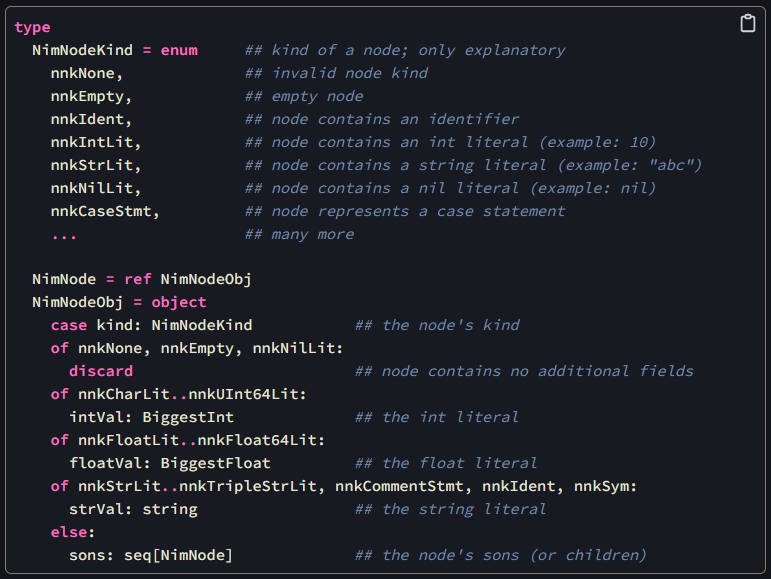
4.3. NimNode and NimNodeKind
As i have already said several times, everything you pass as an argument to a Macro,
becomes a NimNode, and we know that there are at least several kinds.
First of, let's see what the default NimNodeKind is, which can be accessed with the kind property.
Also before that, here is a part of the NimNode definition taken from the macros module's documentation as a point of reference:
When we make mistakes, we usually won't even know that we made one, and then assuming we get no error messages, unless we see the result being horribly wrong, or not what we wanted,
we will not know that we made such a mistake, which if caught too late, can cause all kinds of problems and time delays(the same applies to bad parenting...).
Now in Nim, like in most programming languages, especially the statically typed ones, we have the compiler to help us out, by providing us with errors and their error messages at compilation,
and even runtime.
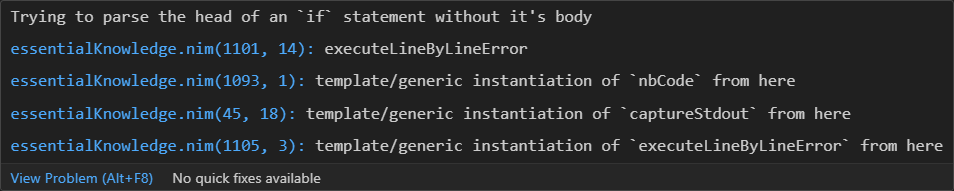
I have one relevant error to this tutorial to produce to help with debugging and preventing unwanted behaviour.
Earlier in the tutorial we parsed some simple Nim Code, now if we tried to parse a string of code of say an if statement, with just it's head/the logic and no body/the code it executes,
we will cause an invalid indentation error.
That error message will not exactly be clear where the problem occured if you were to parse a much longer code string.
To help with this, if we invoked/caused an error when parsing line by line and scope by scope,
the error location would be found much more easily.
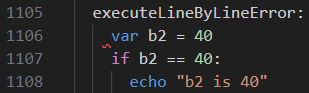
Here is the erroneous parsing example, of trying to parse line by line, which causes an error trying to parse just the head of the if statement:
macro executeLineByLineError(code: untyped) =
result = "".parseStmt #Setting the result variable to the correct typevar linesOfCode: seq[string] = code.repr.splitLines
for line in linesOfCode:
if line.startsWith("if"):
error("Trying to parse the head of an `if` statement without it's body", code) #Second argument is to provide additional information to the compiler for the error's position, etc.else:
result.add line.parseStmt
executeLineByLineError:
var b2 = 40if b2 == 40:
echo"b2 is 40"
Nim's VS Code extension's caught error we caused, followed by where it was caught, and more precisely within the terminal
I am not exactly sure why the line the error is called from is 1106 instead of 1107, but you should be able to figure out the problematic line of code from there fairly easily.
4.6. Nim's macro system uses the same AST as the compiler
By learning Macros, not only will you be able to make your own constructs, domain specific languages, syntatic sugar, etc, but you will be able to understand Nim's Compiler,
and with that access to the huge amount of code, you probably couldn't understand before, that you can now utilize to make your own preprocesor or even a compiler.
Outro - Afterwords
Okay, that's it for this video, thanks for watching like, share and subscribe,
aswell as click the bell icon if you liked it and want more,
you can also support me on Patreon.
If you had any problems with any part of the video,
let me know in the comment section,
the code of this video, script and documentation, are in the link in the description,
as a form of written tutorial.
Thanks to my past and current Patrons
Past Patrons
Goose_Egg: From April 4th 2021 to May 10th 2022
Davide Galilei(1x month)
Current Patrons
jaap groot (from October 2023)
Dimitri Lesnoff (from October 2023)
Compiler Information
Version used: E.G. 2.0.2
Compiler settings used: none, ORC is now the default memory management option(mm:orc)
#Do NOT use {} inside nbText: hlMdF""" """ fields, sometimes it will error, not always#When using - to make a line a list item, you cannot have ANY one of the lines be an empty line#Use spaces by a factor of 2x for indentation in levels# *text* italic# **text** for bold instead of <b></b># ***text*** italic bold#Link 1 - <a href = "link"></a>#Link 2 - [name](link)#Link 3 `name <link>`_ -> without a name works too#nbCodeSkip -> skips the output/echo calls from the file, everything else remains the same#nbCodeInBlock -> opens up a new scope like the "block" statement, useful for when you don't want to use different variable names etc#https://pietroppeter.github.io/nimib/allblocks.html#nbShow is super useful!#https://nim-lang.org/docs/manual.html#lexical-analysis-raw-string-literals raw strings r""import nimib, std/strutils #You can use nimib's custom styling or HTML & CSS
nbInit()
nb.darkMode()
#nbShow() #This will auto open this file in the browser, but it does not check if it is already open#so it keeps bloody opening one after another, i just want a way to update changes quickly# customize source highlighting:
nb.context["highlight"] = """
<link rel="stylesheet" href="https://cdnjs.cloudflare.com/ajax/libs/highlight.js/10.5.0/styles/default.min.css">
<script src="https://cdnjs.cloudflare.com/ajax/libs/highlight.js/10.5.0/highlight.min.js"></script>
<script>hljs.initHighlightingOnLoad();</script>"""# a custom text block that shows markdown sourcetemplate nbTextWithSource*(body: untyped) =
newNbBlock("nbTextWithSource", false, nb, nb.blk, body):
nb.blk.output = body
nb.blk.context["code"] = body
nb.renderPlans["nbTextWithSource"] = @["mdOutputToHtml"]
nb.partials["nbTextWithSource"] = """{{&outputToHtml}}
<pre><code class=\"language-markdown\">{{code}}</code></pre>"""#Overriding nimib's nbCode -> with a version that has horizontal scroll for overflowing outputimport nimib / [capture]
template nbCode(body: untyped) =
newNbCodeBlock("nbCode", body): #Writes to stdout `lineNumb typeOfNBblock: a bit of first line
captureStdout(nb.blk.output):
body
nb.partials["nbCode"] = """
{{>nbCodeSource}}
<pre><code class=\"language-markdown\" style = "color:white;background-color: rgba(255, 255, 255, 0);font-size: 12px;">{{>nbCodeOutput}}</code></pre>
"""
nb.renderPlans["nbCode"] = @["highlightCode"] # default partial automatically escapes output (code is escaped when highlighting)# how to add a ToCvar
nbToc: NbBlocktemplate addToc =
newNbBlock("nbText", false, nb, nbToc, ""):
nbToc.output = "## Table of Contents:\n\n"var index = (section: 0, subsection: 0)
template nbSection(name: string) =
index.section.inc
index.subsection = 0#Reset on a new nbSectionlet anchorName = name.toLower.replace(" ", "-")
nbText "<a name = \"" & anchorName & "\"></a>\n# " & $index.section & ". " & name & "\n\n---"# see below, but any number works for a numbered list
nbToc.output.add "- " & $index.section & r"\. " & "<a href=\"#" & anchorName & "\">" & name & "</a>\n"#\ is HTML code for "\", you can also "\\" or r"\"#If you get an error from the above line, addToc must be ran before any nbSection template nbSubSection(name: string) =
index.subsection.inc
let anchorName = name.toLower.replace(" ", "-")
nbText "<a name = \"" & anchorName & "\"></a>\n## " & " " & $index.section & "." & $index.subsection & ". " & name & "\n\n---"# is inline HTML for a single white space(nothing in markdown)# see below, but any number works for a numbered list
nbToc.output.add " - " & $index.section & r"\." & $index.subsection & r"\. " & "<a href=\"#" & anchorName & "\">" & name & "</a>\n"#If you get an error from the above line, addToc must be ran before any nbSection template nbUoSection(name: string) =
nbText "\n# " & name & "\n\n---"template nbUoSubSection(name: string) =
nbText "\n## " & name & "\n\n---"template nbCodeSnippet(body: untyped) =
newNbCodeBlock("nbCodeSnippet", body):
nb.blk.output = body
nb.partials["nbCodeSnippet"] = """<pre><code class="hlNim">{{&output}}</code></pre>"""
nb.renderPlans["nbCodeSnippet"] = @["highlightCode"]
#Updating the same file is shown instantly once deployed via Github Page on PC. #Mobile takes either a random amount of time, or NOT at all!template addButtonBackToTop() =
nbRawHtml: hlHtml"""
<meta name = "viewport" content = "width = device-width, initial-scale = 1">
<style>
body {} <!-- This is a comment, this needs to be here body {} -->
#toTop {
display: none;
position: fixed;
bottom: 20px;
right: 30px;
z-index: 99;
font-size: 18px;
border: none;
outline: none;
background-color: #1A222D;
color: white;
cursor: pointer;
padding: 15px;
border-radius: 4px;
}
#toTop:hover {background-color: #555;}
#toTopMobile {
display: none;
position: fixed;
bottom: -5px;
right: -5px;
z-index: 99;
font-size: 18px;
border: none;
outline: none;
background-color: #1A222D;
opacity: .2;
color: white;
cursor: pointer;
padding: 15px;
border-radius: 4px;
}
#toTopMobile:hover {background-color: #555;}
</style>
<body>
<button onclick = "topFunction()" id = "toTop" title = "Go to top">Top</button>
<button onclick = "topFunction()" id = "toTopMobile" title = "Go to top">Top</button>
<script>
// Get the button
let myButton = document.getElementById("toTop");
let myButtonMobile = document.getElementById("toTopMobile");
var currentButton = myButton
var hasTouchScreen = false;
//var contentBody = document.getElementsByTagName("body"); //gives a query object
//myButton.style.color = "red"; //This works
//myButton.textContent = contentBody; //This also works .innerHTML, .innerText
//document.body.scrollTop > 20 || document.documentElement.scrollTop > 20
//Above could be used to position the button relativly ?
// Detecting if the device is a mobile device
if ("maxTouchPoints" in navigator)
{
hasTouchScreen = navigator.maxTouchPoints > 0;
}
else if ("msMaxTouchPoints" in navigator)
{
hasTouchScreen = navigator.msMaxTouchPoints > 0;
}
else
{
var mQ = window.matchMedia && matchMedia("(pointer:coarse)");
if (mQ && mQ.media === "(pointer:coarse)")
{
hasTouchScreen = !!mQ.matches;
}
else if ('orientation' in window)
{
hasTouchScreen = true; // deprecated, but good fallback
}
else
{
// Only as a last resort, fall back to user agent sniffing
var UA = navigator.userAgent;
hasTouchScreen = (
/\b(BlackBerry|webOS|iPhone|IEMobile)\b/i.test(UA) ||
/\b(Android|Windows Phone|iPad|iPod)\b/i.test(UA)
);
}
}
if (hasTouchScreen)
currentButton = myButtonMobile
// When the user scrolls down 20px from the top of the document, show the button
window.onscroll = function()
{
scrollFunction()
};
function scrollFunction()
{
if (document.body.scrollTop > 20 || document.documentElement.scrollTop > 20) {
currentButton.style.display = "block";
} else {currentButton.style.display = "none";}
}
// When the user clicks on the button, scroll to the top of the document
function topFunction() {
document.body.scrollTop = 0;
document.documentElement.scrollTop = 0;
}
</script>
"""#TABLE OF CONTENTS - MUST BE RUN BEFORE ANY nbSection !!!
addToc()
addButtonBackToTop()
#Use Live Preview Extension and set the Auto Refresh Preview set to "On changes to Saved Files"#And Server Keep Alive After Embedded Preview Close set to 0, #so that we no longer need the preview embedded window, we now have it in the browser!#Live SERVER Extension no longer works, even with the .html file kept open################START OF FILE#################Adding hlMd enables nimiboost's markdown highlight mode. hlMdf adds the fmt"{var}" functionality
nbText: hlmdf"""
## INTRO - GREETING
- **Title**: Metaprogramming in Nim Essential Knowledge
- **Alt Title**: Essential Knowledge
- **Prerequired knowledge:** Up to and including: Nim for Beginners List Comprehensions with sugar.collect vs Python's List Comprehensions
## INTRO - FOREWORDS
**(What is the purpose of this video ?)**
- Metaprogramming in Nim Essential Knowledge:
- This video will teach you about some of the most useful and required things about Metaprogramming in Nim,
in order for you to be able to metaprogram on your own.
The code for this video and it's script/documentation styled with nimib,
is in the link in the description as a form of written tutorial.
"""
nbSection "`dumpAstGen`"
nbText: """
In the first introductory video, i have shown you the `dumpTree` macro,
which outputted the given code as a description of the code in a tree format,
which gave you the idea on how the macro code has to be structured to get the result we want.
But as the title of this section suggests, there is also the `dumpAstGen` macro,
which does not output the description of the code given,
but macro code that you can directly insert into a macro.
"""
nbSubSection "`stdout.writeLine`"
nbText: """
Here is an example of using the `dumpAstGen` macro with `stdout.writeLine`:
"""
nbCode:
import std/macros

dumpAstGen:
  stdout.writeLine "Hello" & " world!"
nbCodeSnippet: hlnim"""
  nnkStmtList.newTree(
  nnkCommand.newTree(
    nnkDotExpr.newTree(
      newIdentNode("stdout"),
      newIdentNode("writeLine")
    ),
    nnkInfix.newTree(
      newIdentNode("&"),
      newLit("Hello"),
      newLit(" world!")
    )
  )
)
"""
nbText: """
Now let's use that dumped code to make a macro that does `stdout.writeLine "Hello" & " world!"`
All we have to do is `result = ` + the output and that's it, extremely simple.
"""
nbCode:
macro stdoutWriteLine() =
  result = nnkStmtList.newTree(
      nnkCommand.newTree(
      nnkDotExpr.newTree(
        newIdentNode("stdout"),
        newIdentNode("writeLine")
      ),
      nnkInfix.newTree(
        newIdentNode("&"),
        newLit("Hello"),
        newLit(" world!")
      )
    )
  )

stdoutWriteLine
nbSubSection "`echo`"
nbText: """
`echo` example:
<h6>(Show only)</h6>
"""
nbCode:
dumpAstGen:
echo"Hello" & " world!"
nbCodeSnippet: hlnim"""
  nnkStmtList.newTree(
  nnkCommand.newTree(
    newIdentNode("echo"),
    nnkInfix.newTree(
      newIdentNode("&"),
      newLit("Hello"),
      newLit(" world!")
    )
  )
)
"""
nbCode:
macro echoHelloWorld() =
  result = nnkStmtList.newTree(
    nnkCommand.newTree(
      newIdentNode("echo"),
      nnkInfix.newTree(
        newIdentNode("&"),
        newLit("Hello"),
        newLit(" world!")
      )
    )
  )

echoHelloWorld
nbSubSection "sugar.collect"
nbText """
Now let's try something harder with the sugar module's `collect` macro.
"""
nbCode:
import std/sugar

dumpAstGen:
  var pFruit = collect:
    for p in @["banana", "peach", "apple", "pear"]:
      if $p[0] == "p":
        p
  echo pFruit

macro sugarCollect() =
  result = nnkStmtList.newTree(
    nnkVarSection.newTree(
      nnkIdentDefs.newTree(
        newIdentNode("pFruit"),
        newEmptyNode(),
        nnkCall.newTree(
          newIdentNode("collect"),
          nnkStmtList.newTree(
            nnkForStmt.newTree(
              newIdentNode("p"),
              nnkPrefix.newTree(
                newIdentNode("@"),
                nnkBracket.newTree(
                  newLit("banana"),
                  newLit("peach"),
                  newLit("apple"),
                  newLit("pear")
                )
              ),
              nnkStmtList.newTree(
                nnkIfStmt.newTree(
                  nnkElifBranch.newTree(
                    nnkInfix.newTree(
                      newIdentNode("=="),
                      nnkPrefix.newTree(
                        newIdentNode("$"),
                        nnkBracketExpr.newTree(
                          newIdentNode("p"),
                          newLit(0)
                        )
                      ),
                      newLit("p")
                    ),
                    nnkStmtList.newTree(
                      newIdentNode("p")
                    )
                  )
                )
              )
            )
          )
        )
      )
    ),
    nnkCommand.newTree(
      newIdentNode("echo"),
      newIdentNode("pFruit")
    )
  )

sugarCollect
nbText: """
It works! But it is very long, unreadable and complex.
But since it works, this will enable you to dissect and play with any Nimcode.
**Here is my attempt to make it more readable in order to explain,
all the different nodes and such seen in that outputted code:**
<h6>(best viewed in VS Code)</h6>
"""
nbCode:
dumpAstGen:
  var pFruit2 = collect:
    for p in @["banana", "peach", "apple", "pear"]:
      if $p[0] == "p":
        p
  echo pFruit2

macro sugarCollectReadable() =
  result = nnkStmtList.newTree( #The first nnkStmtList is for ALL of the code, resulting ones are for each line(first one does NOT require it)
    nnkVarSection.newTree(nnkIdentDefs.newTree(newIdentNode("pFruit2"), newEmptyNode(), nnkCall.newTree(newIdentNode("collect"),
      nnkStmtList.newTree(
        nnkForStmt.newTree(
          newIdentNode("p"), nnkPrefix.newTree(newIdentNode("@"), nnkBracket.newTree(newLit("banana"), newLit("peach"), newLit("apple"), newLit("pear"))),
            nnkStmtList.newTree(nnkIfStmt.newTree(nnkElifBranch.newTree(
              nnkInfix.newTree(newIdentNode("=="), nnkPrefix.newTree(newIdentNode("$"), nnkBracketExpr.newTree(newIdentNode("p"), newLit(0))), newLit("p")),
                nnkStmtList.newTree(newIdentNode("p")) #Returned element `p`
                  )
                )
              )
            )
          )
        )
      )
    ), #End of collect's assignment block
    nnkCommand.newTree(newIdentNode("echo"), newIdentNode("pFruit2"))
  )

sugarCollectReadable
nbText: "VS Code image to see all of the code at once"
nbRawHtml: hlhtml"""<img src = "Images\All.png" alt = "All">"""
nbSection "Explanations of all the `NimNodes` used with sugar.collect"
nbSubSection "`nnkStmtList`"
nbText: """
To me, this is now much more readable and understandable,
since the parts that should be on the same line, are now on the same line.
Now first of, the `nnk` you see at the start of every statement,
is read as `nim node kind`. So this macro starts with `nim_node_kindStatementList`.
`nnkStmtList` is a kind of a NimNode for containing multiple statements, other NimNodes.
In the above example it represents a line of code.
The first `nnkStmtList` is for ALL of the code captured by the `dumpAstGen`.
The resulting ones/the next ones are for each line of code,
with the first one not requiring one.
"""
nbSubSection "`nnkVarSection`"
nbText: """
nnkVarSection means either a variable with `var`,
or a code section with `var`, like how you declare objects, enumerators, optionally tuples, etc like this:
"""
nbRawHtml: hlhtml"""<img src = "Images\1.png" alt = "Line 1">"""
nbCodeSkip:
var
  a = 1
  b = 0.5
nbSubSection "`.newTree`"
nbText: """
Appending `.newTree` to a `nnkStmtList` or `nnkVarSection` is how one adds code to something, as in append it as a container of child nodes.
For example, using `.newTree` with the `nnkVarSection`, you will then add the `nnkIdent` identifier,
the name of the variable you are making, followed by the value if initializing or the type if declaring,
or both if declaring with initialization(useful for Tuples).
"""
nbRawHtml: hlhtml"""<img src = "Images\1.png" alt = "Line 1">"""
nbSubSection "`nnkEmptyNode`"
nbText: """
The `nnkEmptyNode` is used and present, whenever a value or a type is not explicitly declared and or initialized.
Just like when we write our code normally, the compiler can infer the type from the value.
**Here is an example of all 3, which will show just that:**
"""
nbRawHtml: hlhtml"""<img src = "Images\1.png" alt = "Line 1">"""
nbCode:
dumpAstGen:
var a = 1var b: intvar c: int = 2
nbCodeSnippet: hlnim"""
  nnkStmtList.newTree(
  nnkVarSection.newTree(
    nnkIdentDefs.newTree(
      newIdentNode("a"),
      newEmptyNode(),
      newLit(1)
    )
  ),
  nnkVarSection.newTree(
    nnkIdentDefs.newTree(
      newIdentNode("b"),
      newIdentNode("int"),
      newEmptyNode()
    )
  ),
  nnkVarSection.newTree(
    nnkIdentDefs.newTree(
      newIdentNode("c"),
      newIdentNode("int"),
      newLit(2)
    )
  )
)
"""
nbSubSection "`nnkEmptyNode` explanation and `nnkCall`"
nbText: """
Here is my explanation of the above: <br>
`variableName as declaredType of someValue`,
and so the `collect`'s example of the `dumpAstGen`'s first line then reads as follows:
`pFruit2 as noTypeDeclared of collect -> nnkCall(calls a proc, func, iterator, macro, etc)`
And since `collect` uses whatever logic/a body you want, to collect the elements for a container,
that `nnkCall` doesn't end at the end of that line, but at the end of all the logic for `collect`,
**here is an image to illustrate:**
"""
nbCodeSkip:
dumpAstGen:
  var pFruit2 = collect:
    for p in @["banana", "peach", "apple", "pear"]:
      if $p[0] == "p":
        p
  echo pFruit2
nbRawHtml: hlhtml"""<img src = "Images\EndOfnnkCall.png" alt = "EndOfnnkCall">"""
nbSubSection "`nnkForStmt`"
nbText: """
This one is simple, it's a for loop, that then gets `.newTree` appended to it,
which then contains the structure/head of the for loop, e.g. `for element in container:`.
"""
nbSubSection "`nnkPrefix`"
nbText: """
`newIdentNode("p")` being the first node of the `nnkForStmt.newTree` is the identifier for the element,
`for p`.
Then we get to `nnkPrefix` with `.newTree` appended to it, will hold the following:
`newIdentNode("@")` the symbol used to indicate that we mean a `sequence` and not an `array`,
which is then followed by the `nnkBracket.newTree` which then holds all the elements we gave it,
of type `newLit` short for literal, which is a proc that generates a new NimNode of some Nim's data type like integer and string.
"""
nbSubSection "`nnkIfStmt`,`nnkElifBranch` and `nnkElse` nodes"
nbText """
To best explain this, let's use `dumpAstGen` on a simple `if statement`:
"""
nbCode:
dumpAstGen:
if1 == 1:
echo"1 == 1", " is true"else:
echo"1 is not 1"
nbCodeSnippet: hlNim"""
nnkStmtList.newTree(
  nnkIfStmt.newTree(
    nnkElifBranch.newTree(
      nnkInfix.newTree(
        newIdentNode("=="),
        newLit(1),
        newLit(1)
      ),
      nnkStmtList.newTree(
        nnkCommand.newTree(
          newIdentNode("echo"),
          newLit("1 == 1"),
          newLit(" is true")
        )
      )
    ),
    nnkElse.newTree(
      nnkStmtList.newTree(
        nnkCommand.newTree(
          newIdentNode("echo"),
          newLit("1 is not 1")
        )
      )
    )
  )
)
"""
nbText: "The output is organized into 3 parts, the first part is the `if` statement's head, the condition of `1 == 1`."
nbCodeSnippet: hlNim"""
if 1 == 1:
"""
nbCodeSnippet: hlNim"""
nnkStmtList.newTree(
  nnkIfStmt.newTree(
    nnkElifBranch.newTree(
      nnkInfix.newTree(
        newIdentNode("=="),
        newLit(1),
        newLit(1)
      ),
"""
nbText: """The second part is that `if` statement's body of `echo "1 == 1", " is true"`."""
nbCodeSnippet: hlNim"""
nnkStmtList.newTree(
        nnkCommand.newTree(
          newIdentNode("echo"),
          newLit("1 == 1"),
          newLit(" is true")
        )
      )
    ),
"""
nbText: """
And lastly, the third part is the `else` statement with it's body.
It doesn't require 2 parts like the `if` statement, because it doesn't have a condition,
it's an `else` statement, so it's condition comes from the `if` statement's condition not being met.
"""
nbCodeSnippet: hlNim"""
nnkElse.newTree(
      nnkStmtList.newTree(
        nnkCommand.newTree(
          newIdentNode("echo"),
          newLit("1 is not 1")
        )
      )
    )
  )
)
"""#The below text is for the below code - even i got confused reading this after over a month...
nbText: """
Like with all AST, all of the code from the output of the `dumpAstGen` macro,
starts with a `nnkStmtList.newTree` for the entire block.
Then comes `nnkIfStmt.newTree` which ends right before the starting statement list does.
Then comes the `nnkElifBranch.newTree` which will be present for every if, elif and else statements,
it marks the branch/scope of that conditional statement.
Same level connected conditionals share the same `nnkElifBranch`.
So if you were to nest inside that if statement another if statement,
another `nnkElifBranch` would be called/started there.
**Here is an example of an `if` statement inside an `if` statement:**
"""
nbCode:
dumpAstGen:
if0.5 == 0.5:
echo0.5if0.5.typeis"float":
echo"0.5 is a float"
nbCodeSnippet: hlNim"""
nnkStmtList.newTree(
  nnkIfStmt.newTree(
    nnkElifBranch.newTree(
      nnkInfix.newTree(
        newIdentNode("=="),
        newLit(0.5),
        newLit(0.5)
      ),
      nnkStmtList.newTree(
        nnkCommand.newTree(
          newIdentNode("echo"),
          newLit(0.5)
        ),
        nnkIfStmt.newTree(
          nnkElifBranch.newTree(
            nnkInfix.newTree(
              newIdentNode("is"),
              nnkDotExpr.newTree(
                newLit(0.5),
                newIdentNode("type")
              ),
              newLit("float")
            ),
            nnkStmtList.newTree(
              nnkCommand.newTree(
                newIdentNode("echo"),
                newLit("0.5 is a float")
              )
            )
          )
        )
      )
    )
  )
)
"""
nbText: """
(Starting example) <br>
Then inside the first `nnkElifBranch.newTree` comes `nnkInfix` for the comparsion of `1 == 1`.
And like before all variable names and operators,
the equals operator `==` requires an identifier node `newIdentNode`, followed by 2x `newLit`, literal nodes.
Assignment and for loops don't require an identifier node for `in` and `=`, this is probably some compiler magic.
"""
nbCodeSnippet: hlNim"""
nnkStmtList.newTree(
  nnkIfStmt.newTree(
    nnkElifBranch.newTree(
      nnkInfix.newTree(
        newIdentNode("=="),
        newLit(1),
        newLit(1)
      ),
      nnkStmtList.newTree(
        nnkCommand.newTree(
          newIdentNode("echo"),
          newLit("1 == 1"),
          newLit(" is true")
        )
      )
    ),
    nnkElse.newTree(
      nnkStmtList.newTree(
        nnkCommand.newTree(
          newIdentNode("echo"),
          newLit("1 is not 1")
        )
      )
    )
  )
)
"""
nbText: """
Then after the `nnkInfix.newTree` ends, separated with a comma `,`, comes the body of the `if` statement.
For the `echo` to actually do something, it has to be inside either a `nnkCommand` node's `newTree`,
or inside a `nnkCall`'s `.newTree`. In this case it is a `nnkCommand` node,
with 2x `newLit` nodes, 1x for each of the echo's arguments.
You might have noticed that the `newLit` nodes are used for both numbers and strings.
This is again, because it is a overloaded proc that returns a NimNode of some kind.
And also, since this is an `echo` call which stringifies it's arguments,
there is no need for any more specific node kind, which might be required if you are trying to do something more specific.
Just as a reminder `newIdentNode` is used for variable names, proc names, etc. An identifier is the name of the group `var`, `let` and `const` belong to.
And lastly, part 3 simply starts with `nnkElse.newTree` with another `nnkStmtList.newTree` for the body of the `else statement`,
with an identifier node and it's argument `newIdentNode("echo"), newLit("1 is not 1")`.
"""
nbSubSection: "`nnkNone`"
nbText: """
`nnkNone` is an erroneous or invalid kind of a `NimNode`.
If you get an error message stating that, it means you did something wrong and need to fix it.
"""
nbSection "Debugging at compile-time"
nbText: """
When we used the `dumpAstGen` it outputted the AST of the block of code we gave it in the output tab in VS Code.
Now if we enable VS Code's autosave feature, which you should have enabled for Nim already, it saves the Nim file after every single key stroke.
And with that, the output gets outputted everytime we save the file with a timestamp.
"""
nbRawHtml: hlhtml"""<img src = "Images\timeStamp.png" alt = "Time Stamp">"""
nbText: """
Now this can be very useful to see the changes when constructing a Macro,
if you put some echoes inside a Macro, which will then constantly update.
"""
nbSubSection "`stdout.write`"
nbText: """
**Here is an example of constructing a `stdout.write "Hello!"`:**
"""
nbCode:
macro testMacro() =
result = newNimNode(nnkStmtList)
echo"Start of debugging: "echoresult.repr
result.add newCall("write", newIdentNode("stdout"), newLit("Hello!"))
echoresult.repr
testMacro()
nbText: """
Output:
"""
nbRawHtml: hlhtml"""<img src = "Images\testMacroOutput.png" alt = "testMacro Output">"""
nbText: """
Again, the above output will constantly update
"""
nbSubSection "`repr` proc"
nbText: """
We have used `repr` before in my videos, but before now it wasn't exactly all that useful or required.
But when working with Macros, it is mandatory for usage with the `echo` proc,
because everything inside a Macro that isn't specifically declared/initialized as a data type that is NOT a NimNode,
will be a NimNode. This is why i have used the `repr` proc in the above subsection,
without it, we cannot even compile as we will get an error.
"""
nbSubSection "`static` statement"
nbText: """
In a previous video we have used `static` to make a data type be known at compile-time with the `static` keyword.
There is also the `static` statement, which takes a block of code and treats it as compile-time.
This can be very useful for writting code that should execute at the compilation of the program,
for example to determine the operating system the user of the program is running on,
which can then be used to have different behaviour based on the OS/operating system.
**Here is an example:**
"""
nbCode:
static:
ifdefined windows:
echo"The OS is Windows"
nbText: """
This will output "The OS is Windows" in the output tab.
**And here is a version using the `when` compile-time version of the `if` statement i have shown long ago:**
"""
nbCode:
whendefined windows:
echo"The OS is Windows"
nbText: """
This will echo "The OS is Windows" at runtime in the terminal,
because `when defined windows` will be checked at compile-time,
while the `echo "The OS is Windows`, will be displayed at runtime.
Now back to the `static` statement.
To demonstate better how the `static` statement can be used for faster debugging,
**here is a better example:**
"""
nbCode:
import std/algorithm

static:
  let seqNumbers = [-100, 100, 0, -1, 1]
  echo seqNumbers
  echo seqNumbers.sorted()
  echo seqNumbers.sorted(order = SortOrder.Descending)
nbRawHtml: hlhtml"""<img src = "Images\staticDebug1.png" alt = "staticDebug1">"""
nbText: """
<h6>The reason there are 2x timestamps in the output, is because we are using echo 3x times,
to fix this, simply put all the data you want outputed in a single `echo` call with `\n` for newlines.</h6> <br>
The reason i used the `let` keyword instead of `var` and `sorted` procs which return a new copy instead of `sort` which modifies the existing container,
is because all the values/data you are working on at compile-time, must be known at compile-time.
We could of also used `var` above, and if you do not change it, it will work.
But using `let` is to better demonstrate that you should not change it.
`const` is the much prefered keyword to be used for "identifiers" at compile-time,
which doesn't need to be inside a `static` block if you use it with other compile-time statements like the `when` statement.
Now, if you were to change the elements of our `seqNumbers` sequence, the output will be updated immediately without having to compile.
"""
nbRawHtml: hlhtml"""<img src = "Images\staticDebug2.png" alt = "staticDebug2">"""
nbText: """
This has the potential to save you quite a bit of time, if you like to tinker a lot, and or the code takes a while to compile(long programs).
"""
nbSection "More Metaprogramming Essentials"#No text here, move straight to the next subsection
nbSubSection "Parsing Nimcode"
nbText: """
If we use a Macro with an argument, that argument can be a body of valid Nim Code,
which the Macro will receive as a NimNode, which can then be turned into `string` with the `repr` proc for debugging.
Which can then also be parsed with the `parseStmt` for multiple lines of code, and `parseExpr` for a singular line of code.
You should only do this if you already have some valid Nim code in the form of a string,
you should NOT use strings to generate new Nim code, domain specific languages etc.
**Here is an example of taking a block of code into a Macro, and then parsing it in order to execute the given code:**
"""
nbCode:
macro executeCode(code: untyped) =
result = code.repr.parseStmt
echoresult.repr #the same as running this before `.parseStmt`
executeCode:
var a = 10echo a
nbText: """
Output of `echo result.repr`:
"""
nbRawHtml: hlhtml"""<img src = "Images\executeCodeOutput.png" alt = "executeCodeOutput">"""
nbText: """
As you can see the code is captured whole as a block.
"""
nbSubSection "Parsing Nimcode use case"
nbText """
Whenever you want to extract some specific data from a string, e.g. a number and then use it like a number would be used, you first need to parse it like we have done in the past.
**[In case it is NOT clear]**
<h6>A "parser" is NOT a "compiler". A parser translates/converts string into AST which is then passed to a compiler that then compiles to machine code, which can then be executed.
In Nim's case it compiles to the "c" programming language first, which then get compiled via a "c" compiler like the "gcc" that Nim uses by default.
I am saying this, for the reason of dissuading you from using parsing of `parseExpr` and `parseStmt` to generate Nim code.</h6>
A concrete example and use case of using "strings" to generate code, is the `Nim's Playground`, which i have used in the past to share the code of my videos.
So if you already have existing valid code, like the code one writes on the `Nim's Playground`, you will use a parsing proc like `parseExpr` for singular and `parseStmt` for multiple code statements.
For every other code generation like a domain specific language, some new behaviour you want to use, etc, you will use Nim Nodes like at the start of this tutorial,
because it has a known, well defined structure, which makes it easier to generate new code, with introspection(logic) and be less error prone.
It's hard to find an error in a string.
Now if you are in need of this use case, you can use the `strformat` module to get procs and the like, to greatly help you with that.
"""#Why am i repeating what i just said in the subsection above ? Because too many people use "strings" to generate new Nim code, instead of using Nim Nodes specifically made for this!
nbSubSection "`NimNode` and `NimNodeKind`"
nbText: """
As i have already said several times, everything you pass as an argument to a Macro,
becomes a `NimNode`, and we know that there are at least several kinds.
First of, let's see what the default `NimNodeKind` is, which can be accessed with the `kind` property.
Also before that, here is a part of the `NimNode` definition taken from the `macros` module's documentation as a point of reference:
"""
nbRawHtml: hlhtml"""<img src = "Images\NimNodeDefinition.png" alt = "NimNodeDefinition">"""
nbCode:
macro defaultNimNodeKind(body: untyped) =
  echo body.kind

defaultNimNodeKind:
  const aList: array[3, string] = ["banana", "pencil", "dirt"]
nbText: """
`NimNodeKind` is an enumerator that is then used in the `NimNodeObj` which is a reference to the NimNode,
to determine the data type for that kind.
Here is the output of the default `NimNode`'s kind
"""
nbRawHtml: hlhtml"""<img src = "Images\defaultNimNodeKind.png" alt = "defaultNimNodeKind">"""
nbSubSection "ExpectNimNode"
nbText: """
When passing arguments to a Macro, one can check the `NimNodeKind` in order to enforce a desired functionality,
with one of the following procs:
- expectIdent(n: NimNode; name: string)
- expectKind(n: NimNode; k: NimNodeKind)
- expectKind(n: NimNode; k: set[NimNodeKind])
- expectLen(n: NimNode; len: int) - exact number of children nodes
- expectLen(n: NimNode; min, max: int) - number of children nodes in a range
- expectMinLen(n: NimNode; min: int)
All of these will abort compilation with an error message if the condition is not met.
**Here are examples for each and every one of them:**
"""
nbText: """`expectIdent(n: NimNode; name: string)`"""
nbCode:
macro eIdent(body: untyped) =
  expectIdent(body, "myVar")

eIdent("myVar")
#eIdent("myVa") #Error
nbRawHtml: hlhtml"""<img src = "Images\expectIdentError.png" alt = "expectIdentError">"""
nbText: """`expectKind(n: NimNode; k: NimNodeKind)`"""
nbCode:
macro eKind(body: untyped) =
  expectKind(body, nnkStrLit)

eKind("myVar")
nbText: """`expectKind(n: NimNode; k: set[NimNodeKind])`"""
nbCode:
macro eKind2(body: untyped) =
  expectKind(body, {nnkStrLit, nnkIntLit})

eKind2("myVar")
eKind2(15)
nbText: """`expectLen(n: NimNode; len: int)` - exact number of children nodes"""
nbCode:
macro eLen(body: varargs[untyped]) =
  expectLen(body, 2)

eLen(1, 2)
nbText: """`expectLen(n: NimNode; min, max: int)` - number of children nodes in a range"""
nbCode:
macro eLen2(body: varargs[untyped]) =
  expectLen(body, 0, 2)

eLen2()
eLen2(1)
eLen2(1, 2)
nbText: """`expectMinLen(n: NimNode; min: int)`"""
nbCode:
macro eMinLen(body: varargs[untyped]) =
  expectMinLen(body, 2)

eMinLen(1, 2)
eMinLen(1, 2, 3, 4)
nbSubSection "Using Error Messages"
nbText: """
When we make mistakes, we usually won't even know that we made one, and then assuming we get no error messages, unless we see the result being horribly wrong, or not what we wanted,
we will not know that we made such a mistake, which if caught too late, can cause all kinds of problems and time delays(the same applies to bad parenting...).
Now in Nim, like in most programming languages, especially the statically typed ones, we have the compiler to help us out, by providing us with errors and their error messages at compilation,
and even runtime.
I have one relevant error to this tutorial to produce to help with debugging and preventing unwanted behaviour.
Earlier in the tutorial we parsed some simple Nim Code, now if we tried to parse a string of code of say an `if` statement, with just it's head/the logic and no body/the code it executes,
we will cause an `invalid indentation` error.
That error message will not exactly be clear where the problem occured if you were to parse a much longer code string.
To help with this, if we invoked/caused an error when parsing line by line and scope by scope,
the error location would be found much more easily.
**Here is the erroneous parsing example, of trying to parse line by line, which causes an error trying to parse just the head of the `if` statement:**
"""
nbCodeSkip:
macro executeLineByLineError(code: untyped) =
result = "".parseStmt #Setting the result variable to the correct typevar linesOfCode: seq[string] = code.repr.splitLines
for line in linesOfCode:
if line.startsWith("if"):
error("Trying to parse the head of an `if` statement without it's body", code) #Second argument is to provide additional information to the compiler for the error's position, etc.else:
result.add line.parseStmt
executeLineByLineError:
var b2 = 40if b2 == 40:
echo"b2 is 40"
nbText: """Nim's VS Code extension's caught error we caused, followed by where it was caught, and more precisely within the terminal"""
nbRawHtml: hlhtml"""<img src = "Images\CustomErrorVSCode.png" alt = "CustomErrorVSCode">"""
nbRawHtml: hlhtml"""<img src = "Images\CustomErrorVSCode2.png" alt = "CustomErrorVSCode2">"""
nbRawHtml: hlhtml"""<img src = "Images\CustomErrorTerminal.png" alt = "CustomErrorTerminal">"""
nbText: """
I am not exactly sure why the line the error is called from is 1106 instead of 1107, but you should be able to figure out the problematic line of code from there fairly easily.
"""
nbSubSection "Nim's macro system uses the same AST as the compiler"
nbText: """
By learning Macros, not only will you be able to make your own constructs, domain specific languages, syntatic sugar, etc, but you will be able to understand Nim's Compiler,
and with that access to the huge amount of code, you probably couldn't understand before, that you can now utilize to make your own preprocesor or even a compiler.
"""
nbUoSection "Outro - Afterwords"
nbText: """
Okay, that's it for this video, thanks for watching like, share and subscribe,
aswell as click the bell icon if you liked it and want more,
you can also support me on Patreon.
If you had any problems with any part of the video,
let me know in the comment section,
the code of this video, script and documentation, are in the link in the description,
as a form of written tutorial.
"""
nbUoSection "Thanks to my past and current Patrons"
nbUoSubSection "Past Patrons"
nbText: """
- Goose_Egg: From April 4th 2021 to May 10th 2022
- Davide Galilei(1x month)
"""
nbUoSubSection "Current Patrons"
nbText: """
- jaap groot (from October 2023)
- Dimitri Lesnoff (from October 2023)
"""
nbUoSubSection "Compiler Information"
nbText: """
- Version used: E.G. 2.0.2
- Compiler settings used: none, ORC is now the default memory management option(mm:orc)
"""
nbUoSubSection "My and General Links"
nbText: """
- [Patreon](https://www.patreon.com/Kiloneie?fan_landing=true "Patreon")
- [Visual Studio Code Shortcuts](https://code.visualstudio.com/shortcuts/keyboard-shortcuts-windows.pdf "Visual Studio Code Shortcuts")
"""
nbUoSubSection "Links to this video's subject:"
nbText: """
- [startsWith func](https://nim-lang.org/docs/strutils.html#startsWith%2Cstring%2Cstring "startsWith func")
- [from import statement](https://nim-lang.org/docs/manual.html#modules-from-import-statement "from import statement")
- [sort func](https://nim-lang.org/docs/algorithm.html#sort%2CopenArray%5BT%5D%2Cproc%28T%2CT%29 "sort func")
- [sorted proc](https://nim-lang.org/docs/algorithm.html#sorted%2CopenArray%5BT%5D%2Cproc%28T%2CT%29 "sorted proc")
- [macros module](https://nim-lang.org/docs/macros.html "macros module")
"""
nbSave()